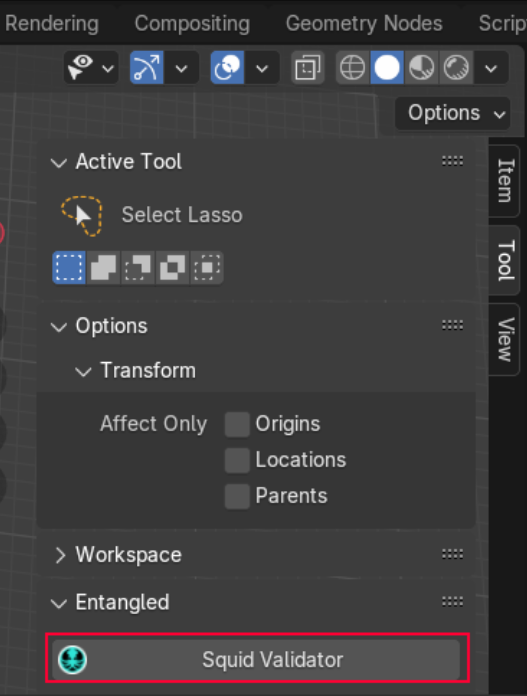
Squid Validator
SquidValidator is a tool that integrates into Maya, 3ds Max and Blender, that is designed to perform automated checks on 3D scenes and geometry. The tool has a large list of customizable checks, the ability to create presets for specific projects, automatic error correction, convenient object filtering settings, as well as statistics collection. SquidValidator is designed to minimize errors and save time during the production and QA stages.
Downloads
Functions - general description
Asset export - exporting assets from the scene to FBX format.
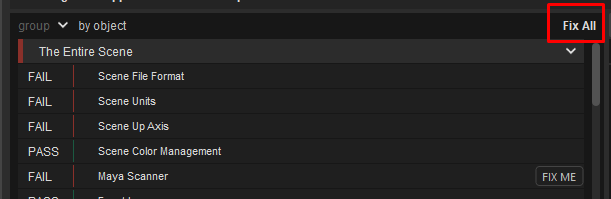
Execution of checks - checking the objects selected in the scene. After the test, the program produces a report with the following results: “PASS”, “INFO”, “FAIL”. Some test results may contain instructions to handle found issues (“FIX ME” button).
Project setup and checklist presets - projects is a set of hierarchy description, check queues and export options and could be shared with other users through the synchronization server. Checklist presets is a state that could be saved locally.
Collection of statistics - collecting statistics on the number of checks and operations performed, time spent checking, etc.
Installation
Maya
- Make sure that Maya is closed
- Select the required Squid Validator on this page in Downloads
- Select Squid Validator version
- Launch the installer and press “Install”

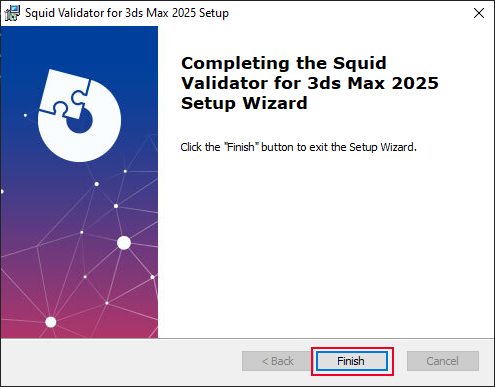
- Wait till install is done and press “Ready”
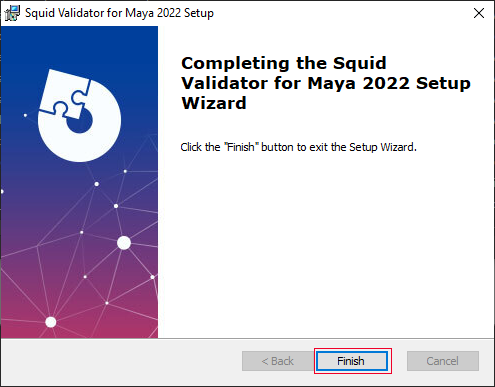
- Launch Maya and find "Squid" shelf
- Run the validator from the icon


3ds Max
- Make sure that 3ds Max is closed
- Select the required Squid Validator on this page in Downloads
- Select Squid Validator version
- Launch the installer and press “Install”
- Wait till install is done and press “Ready”
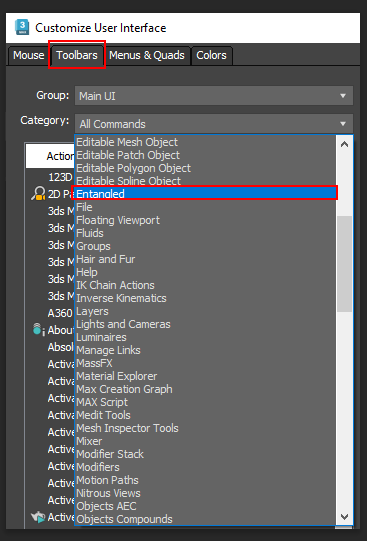
- Launch 3ds max and open Customize User Interface

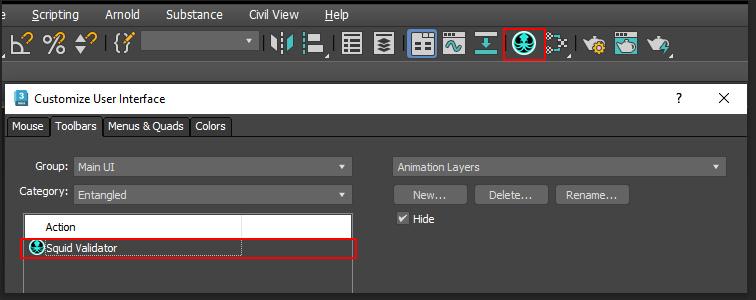
- Choose Toolbars and Entangled category
- Find Squid Validator and pull out onto the tool shelf
Blender
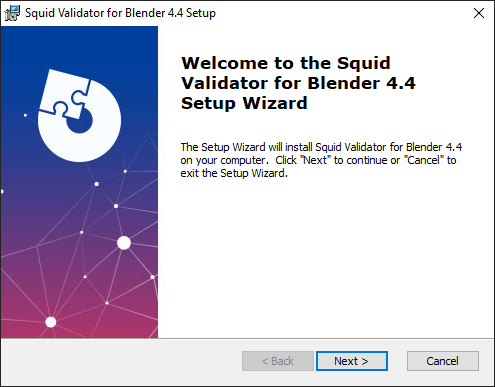
- Make sure that Blender is closed
- Select the required Squid Validator on this page in Downloads
- Select Squid Validator version
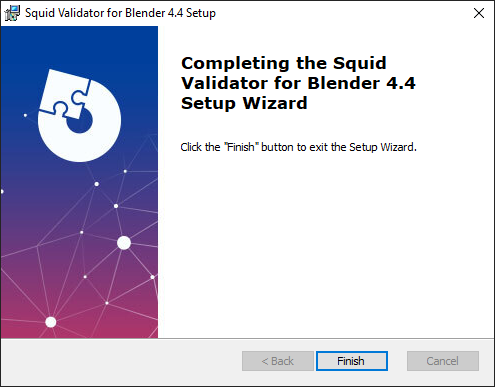
- Launch the installer and press “Install”
- Wait till install is done and press “Ready”
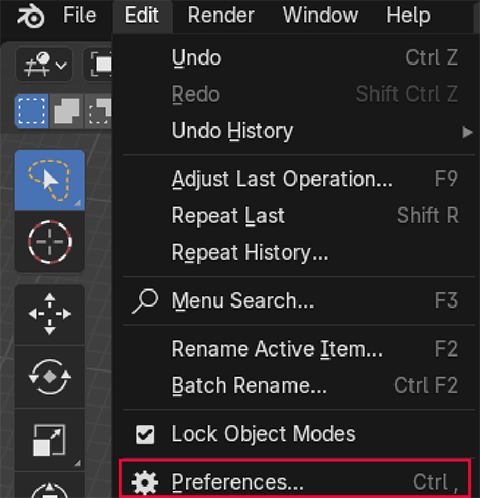
- Launch Blender and open Preferences
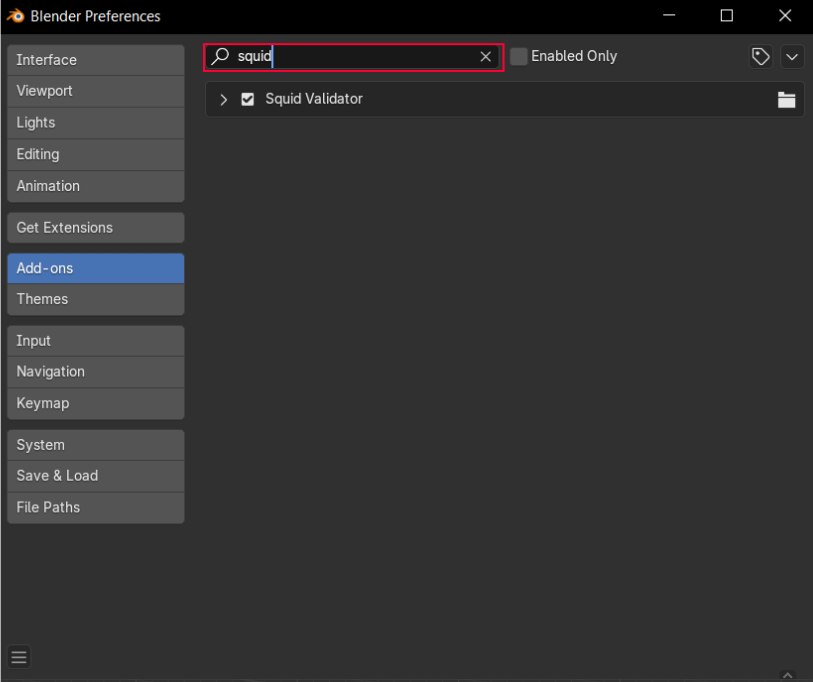
- Type "squid" in Add-ons search bar and activate Squid Validator
- Find Squid Validator in Tool -> Entangled

Licensing
Internet connection is required for licensing. Make sure your system allows this for the target software - Maya, 3ds Max or Blender.
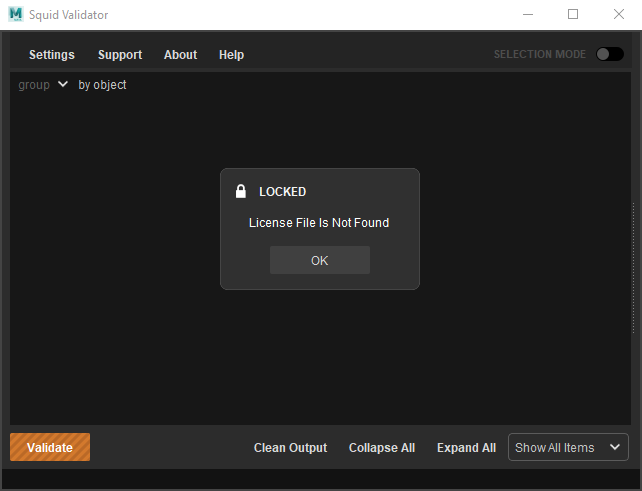
Without a license the user can not use the program. If the user tries to validate the object or hierarchy, create and save the project, get hierarchy from scene, the “Locked” window with “License file is not found” message appears.
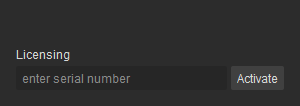
To activate the validator the user needs to enter activation code in settings and press the “Activate” button.
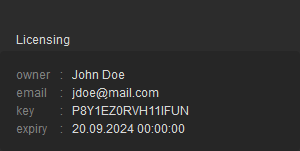
After that the license information will appear in Setting window.
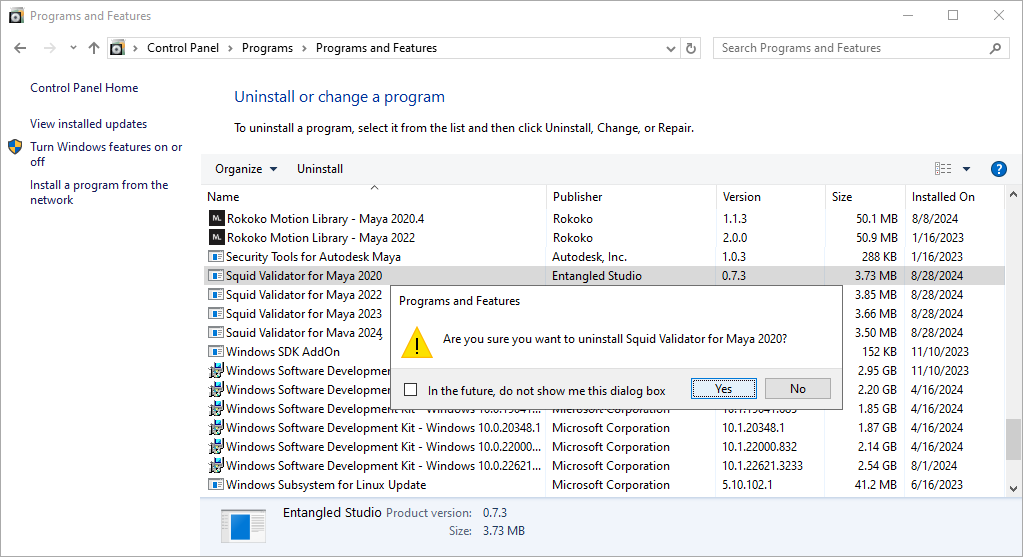
Uninstallation
Maya
- Close the Maya
- Open Control Panel → Programs → Programs and Features
- Find the SquidValidator and Press “Uninstall”
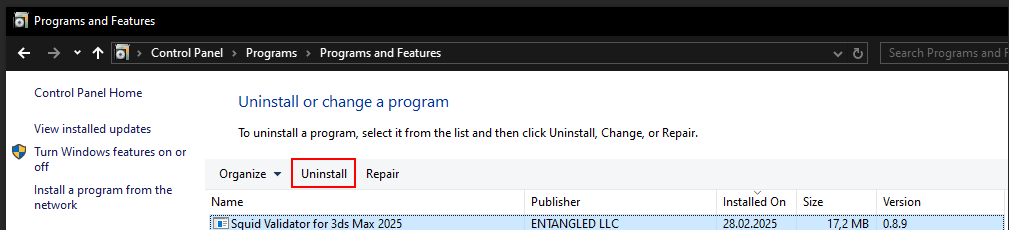
3ds Max
- Close the 3ds Max
- Open Control Panel → Programs → Programs and Features
- Find the SquidValidator and Press “Uninstall”
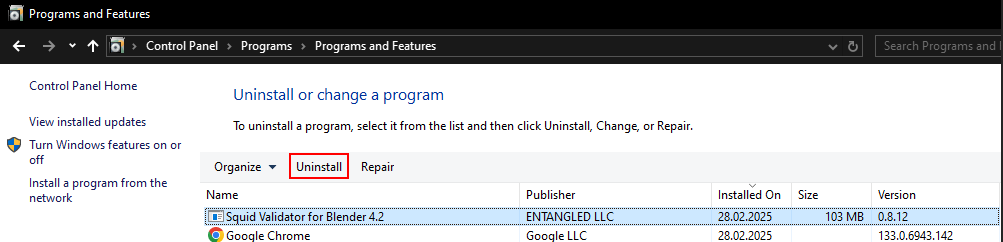
Blender
- Close the Blender
- Open Control Panel → Programs → Programs and Features
- Find the SquidValidator and Press “Uninstall”
List of checks
Maya
| Name | Brief description of checks |
|---|---|
| Scene | |
| File format | check if this scene is saved as an ASCII or binary file type |
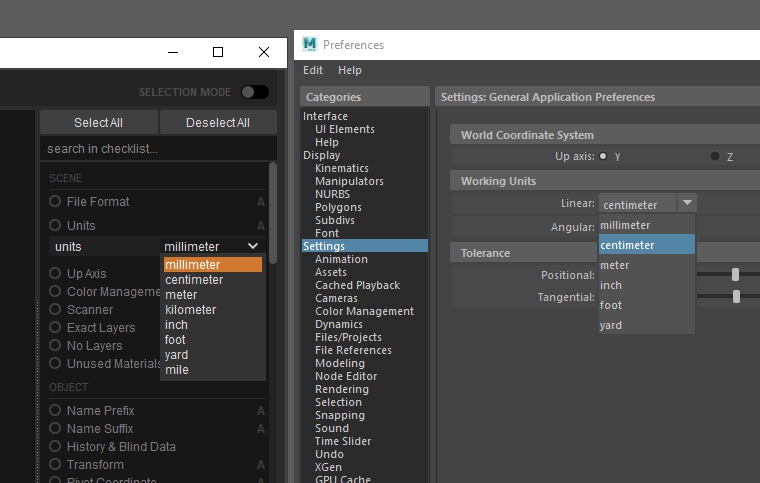
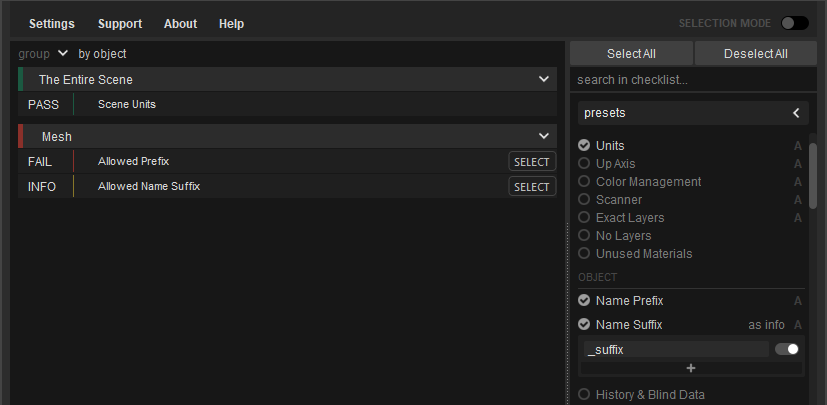
| Units | check the units in which you currently work in Maya |
| Up Axis | check that defined axis used as the up direction |
| Color management | check if color management is ON or OFF in the scene |
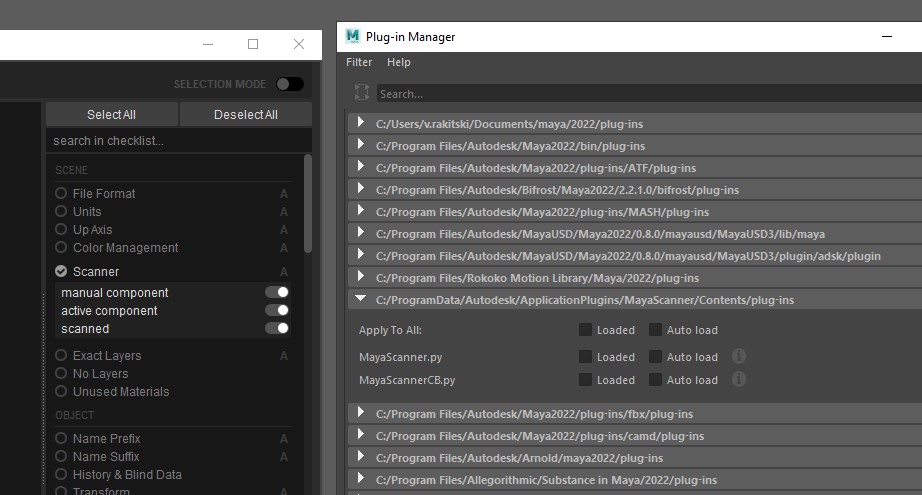
| Scanner | check if MayaScanner and MayaScanerCB plugins are loaded, and scanned for known malicious scripts |
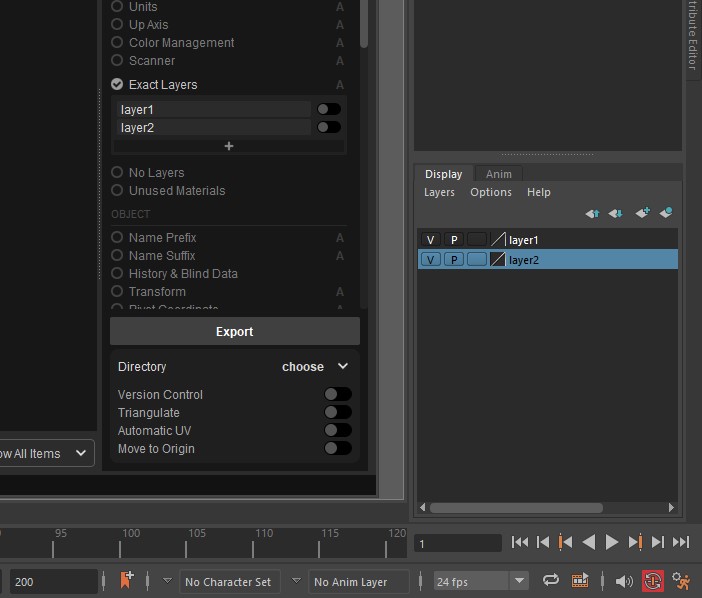
| Exact Layers | check if scene have valid layer names |
| No Layers | check for extra layers in scene |
| Unused Materials | check if this scene has materials that are not used |
| Object | |
| Name prefix | check object names for allowed prefixes |
| Name suffix | check object names for allowed for suffixes |
| History & Blind Data | this check searching and cleaning up the history, including BlindData |
| Transform | checking if objects have null transforms |
| Pivot Coordinate | check that object pivot coordinates are equal to its transform coordinates |
| Tangent Space | check that shape is representing a right/left-handed coordinate system |
| Animation Attributes | check for animated attributes |
| Mesh | |
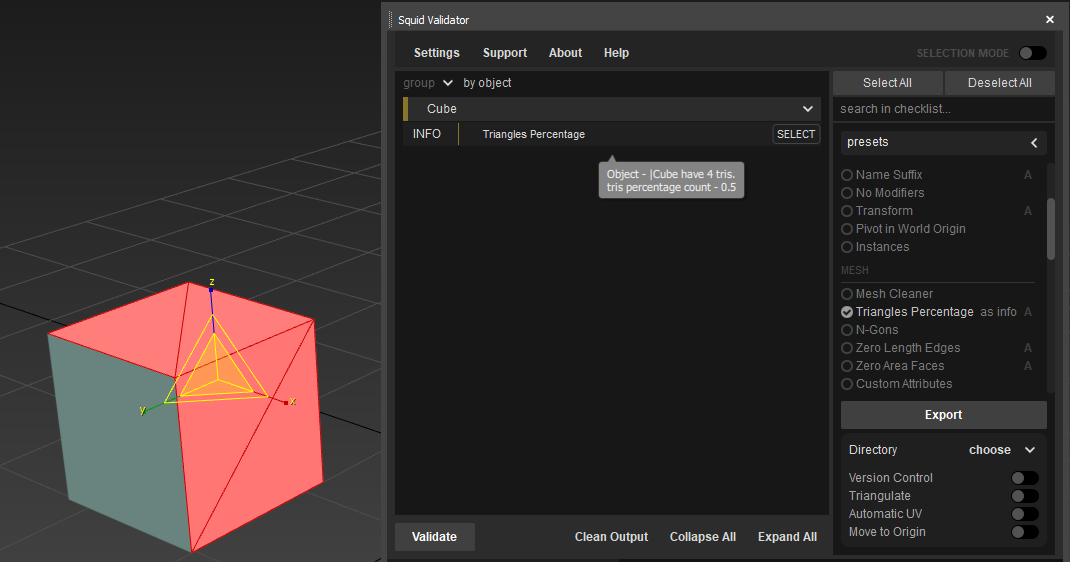
| Triangles Percentage | check how much triangle has mesh |
| Small Faces | check if has a small area polygons |
| Thin Faces | check if mesh has a thin or long polygons |
| N-Gons | checking geometry for n-gons |
| Has No Soft Edges | check if mesh does not have hard edges only (has at least one soft edge) |
| Vertex Normals | check if mesh has vertices with locked/unlocked normals |
| Exact Color Sets | check if objects have valid color set names |
| No Color Sets | check if objects have any color set |
| Custom Attributes | checking geometry for user defined attributes |
| Duplicate Faces | checking geometry for duplicates of faces |
| Mesh Non-Manifold | |
| Concave Faces | checks for concave faces |
| Faces With Holes | checks for faces with holes |
| Non-Planar Faces | checks for non-planar faces |
| Lamina Faces | checks for faces that share all of their edges |
| Non-Manifold Geometry | checks for invalid polygon geometry |
| Zero Length Edges | checks for edges that are very short, within the specified tolerance |
| Zero Area Faces | checks for faces with area within the specified tolerance |
| Zero Map Area Faces | checks for faces with map area, within the specified tolerance |
| Isolated Components | checks for isolated edges, vertices, and UVs on the selected object |
| Mapping | |
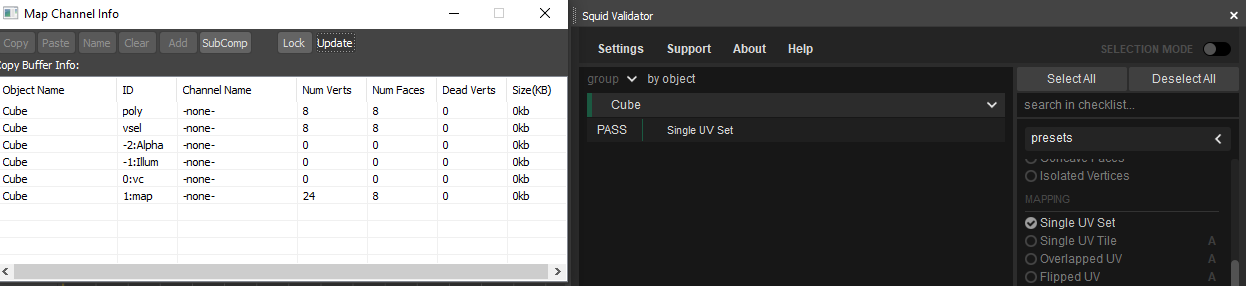
| Single UV Set | checking if mesh have more than one UV set |
| Single UV Tile | checking if texture coordinates lie in one UV tile range (wrong result would be shown as error message) |
| Overlapped UV | checking if mesh have overlapped UV faces (wrong result would be shown as error message) |
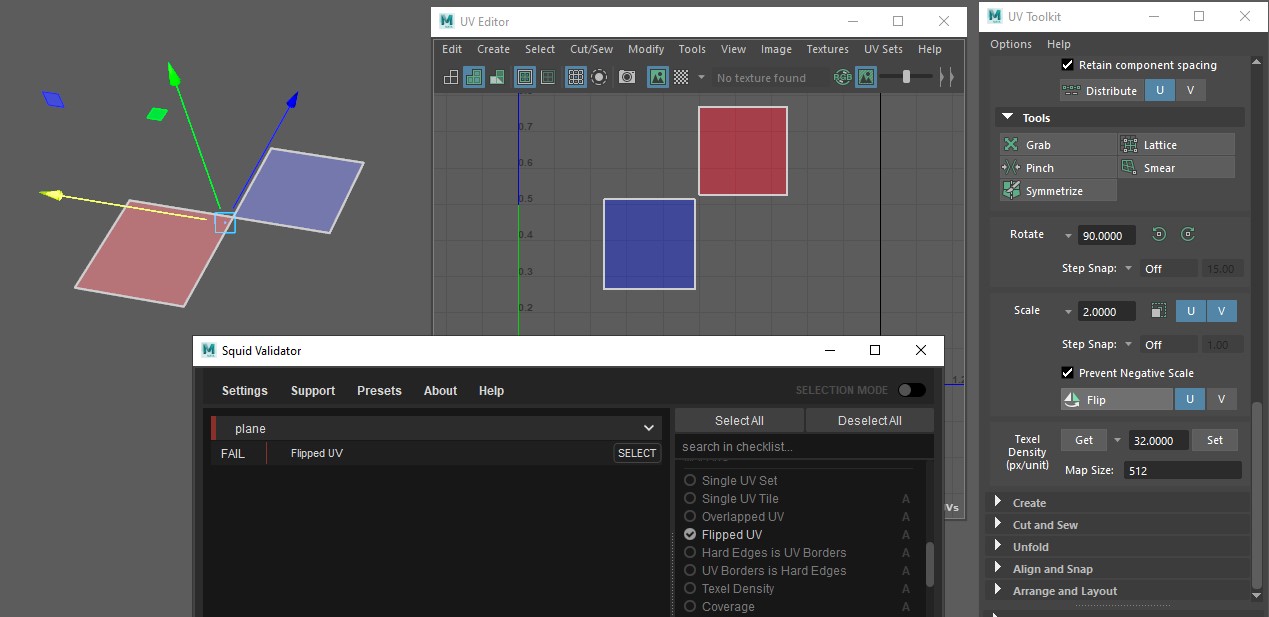
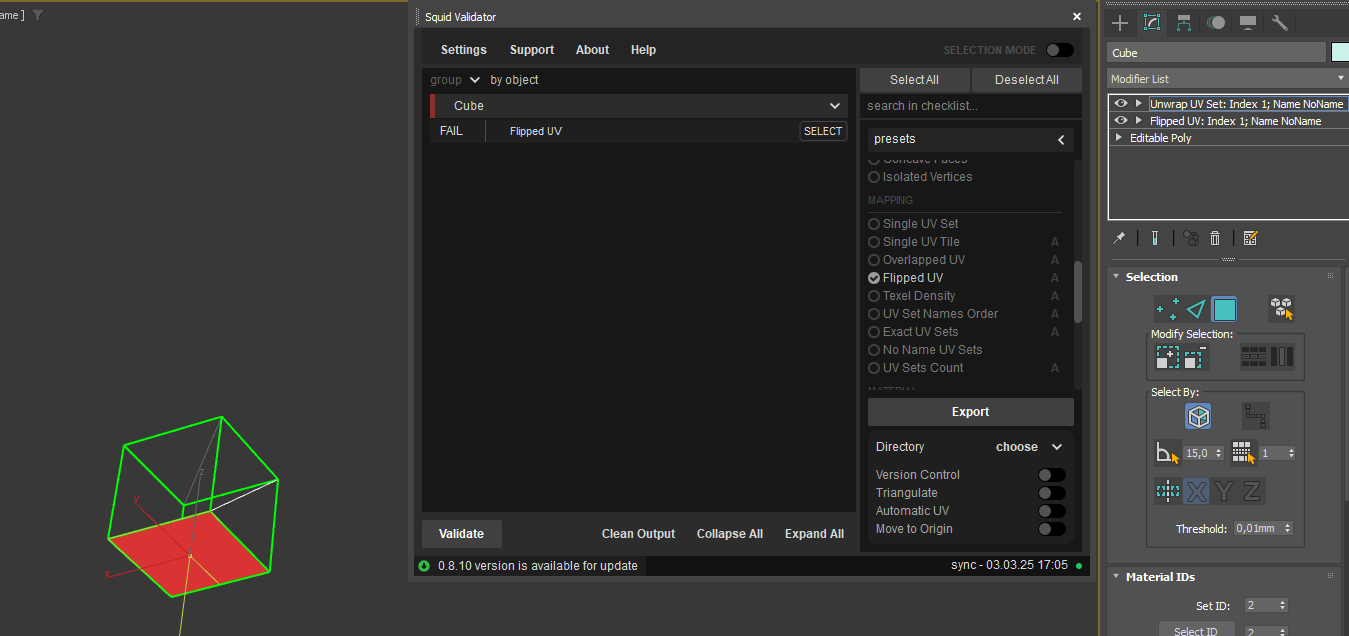
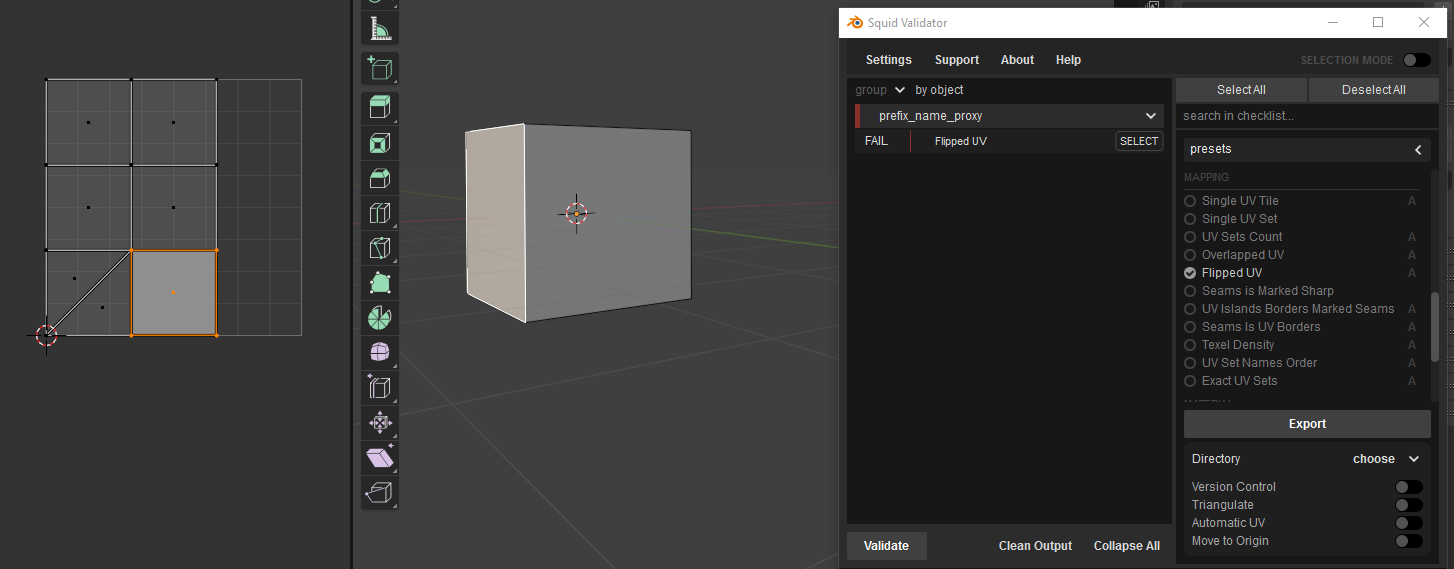
| Flipped UV | checking if mesh have flipped UV faces (wrong result would be shown as error message) |
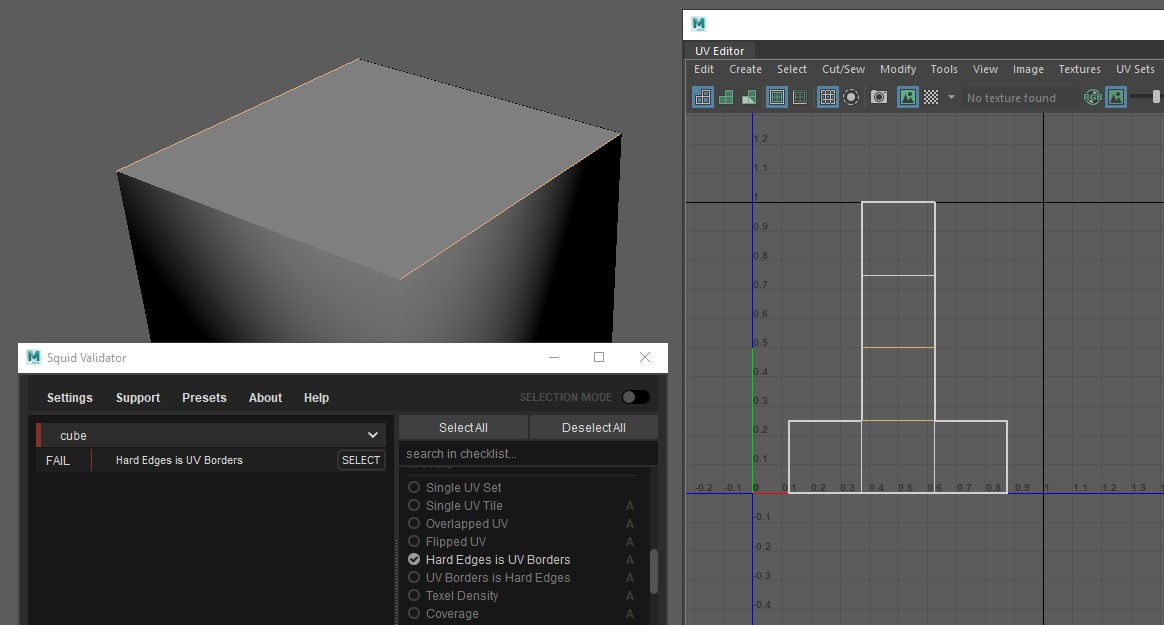
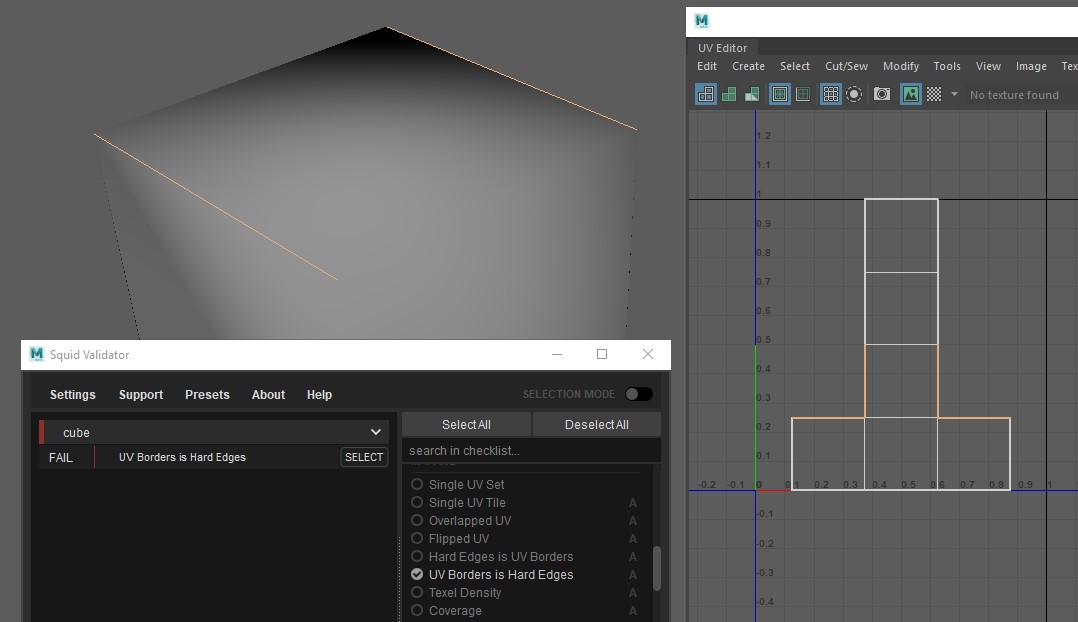
| Hard Edges is UV Borders | this check gets all hard edges of the mesh and checks if they are represented as border on UV |
| UV Border is Hard Edges | this check gets all UV borders of the mesh and checks if they are represented as hard edges |
| Texel Density | checking if mesh valid texel density |
| Coverage | check the space coverage of the first UV tile |
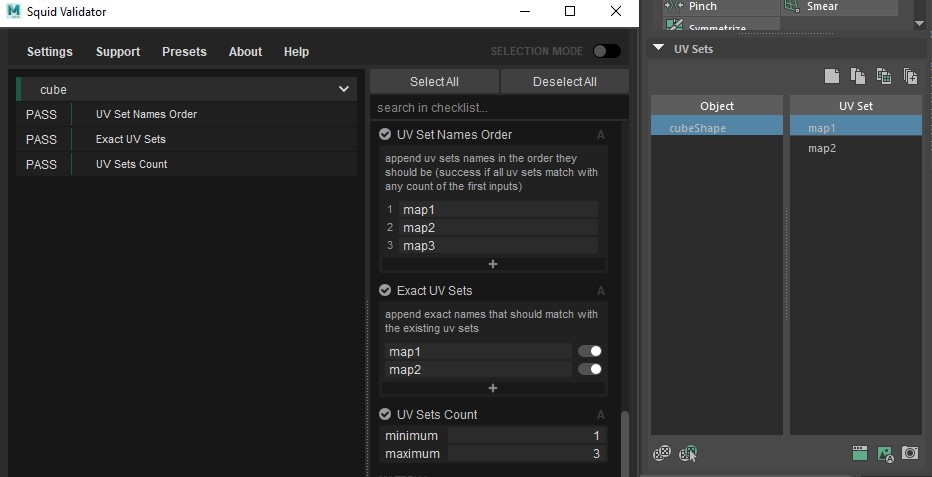
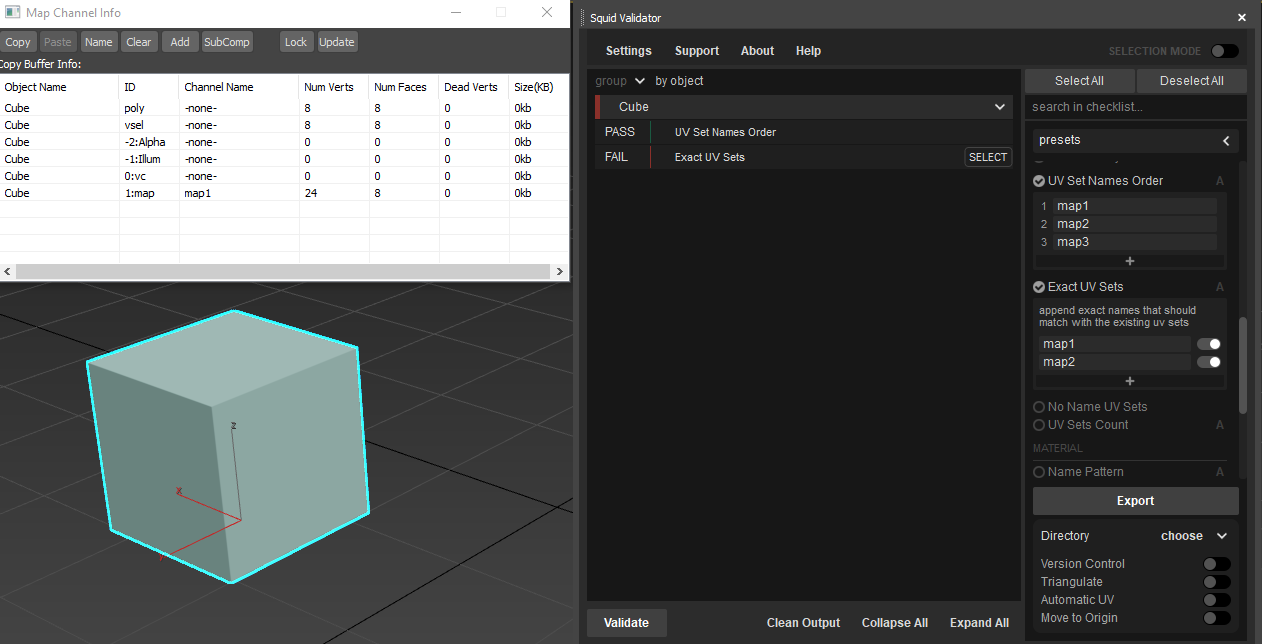
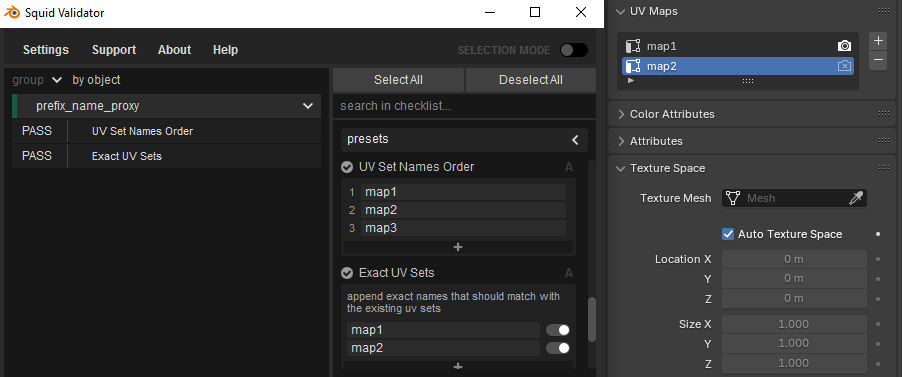
| UV Set Names Order | checking the order of uv sets names |
| Exact UV Set | check if objects have valid UV set names |
| UV Sets Count | check the count of uv sets |
| Material | |
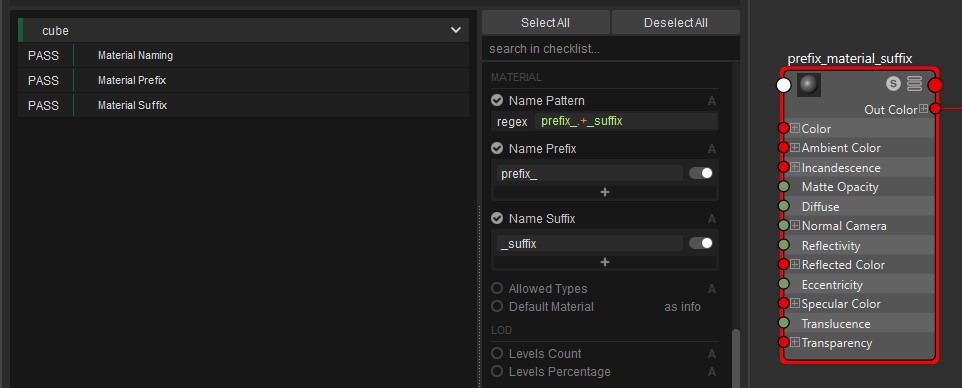
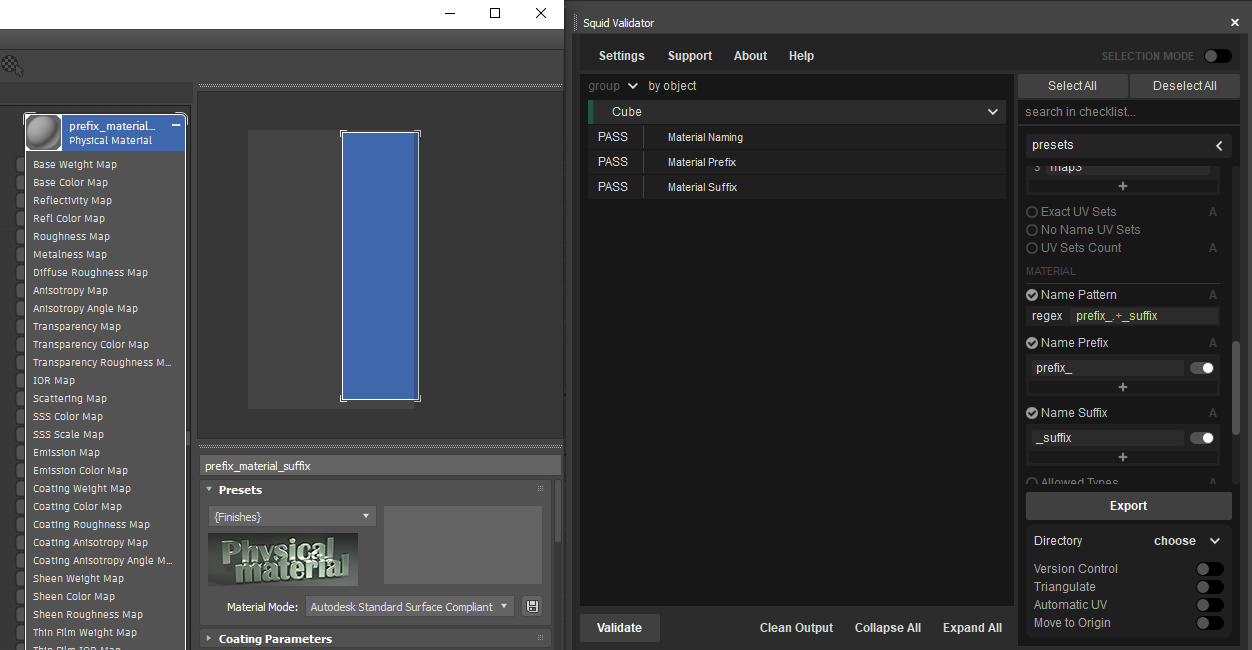
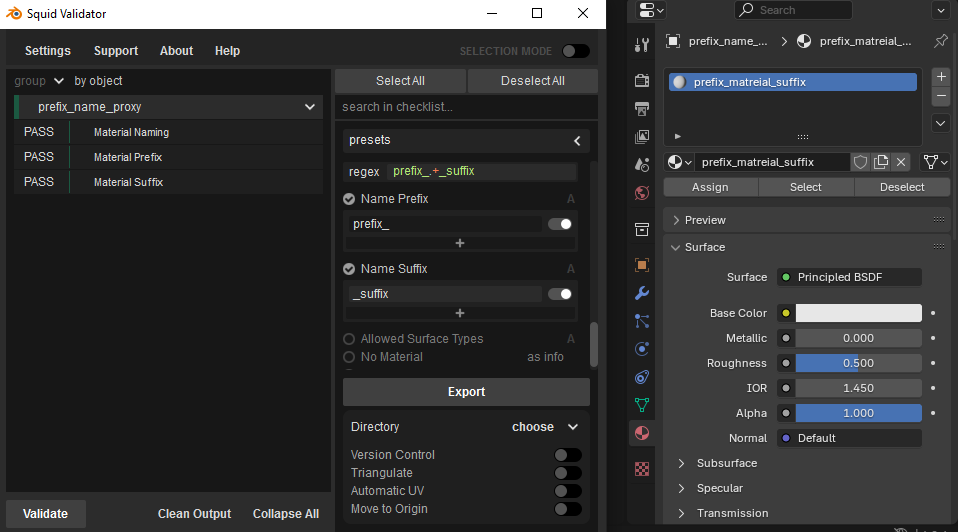
| Name Pattern | check material names using regular expression |
| Name Prefix | check material names for allowed prefixes |
| Name Suffix | check material names for allowed suffixes |
| Allowed Types | check objects for allowed material types |
| Default Material | this check detects polygons without materials on them |
| LOD | |
| Levels Count |
check a number of LOD levels note: use this check on levels group |
| Levels Percentage |
check triangle count for each LOD mesh as a
percentage related to the first one note: use this check on levels group |
3ds Max
| Name | Brief description of checks |
|---|---|
| Scene | |
| Units | check the units in which you currently work in Max |
| Exact Layers | check if scene have valid layer names |
| No Layers | check for extra layers in scene |
| Object | |
| Name prefix | check object names for allowed prefixes |
| Name suffix | check object names for allowed for suffixes |
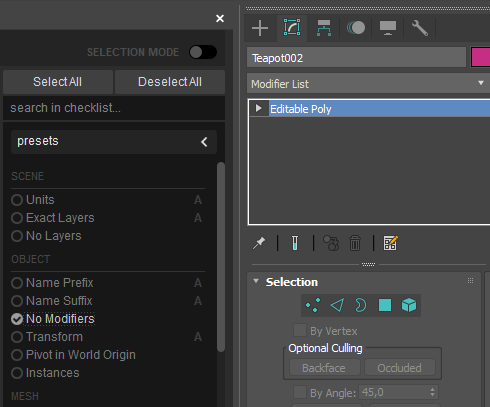
| No Modifiers | checking objects for modifiers |
| Transform | checking if objects have null transforms |
| Pivot in World Origin | check that object pivot lie at world origin coordinates |
| Instances | check objects for instances group |
| Mesh | |
| Mesh Cleaner | check mesh via Mesh Cleaner modifier |
| Triangles Percentage | check how much triangle has mesh |
| N-Gons | checking geometry for n-gons |
| Zero Length Edges | checks for edges that are very short, within the specified tolerance |
| Zero Area Faces | checks for faces with area, within the specified tolerance |
| Custom Attributes | checking geometry for user defined attributes |
| Concave Faces | checks for concave faces |
| Isolated Vertices | checks the isolated vertices on mesh |
| Duplicate Faces | checking geometry for duplicates of faces |
| Mapping | |
| Single UV Set | checking if mesh have more than one UV set |
| Single UV Tile | checking if texture coordinates lie in one UV tile range (wrong result would be shown as error message) |
| Overlapped UV | checking if mesh have overlapped UV faces (wrong result would be shown as error message) |
| Flipped UV | checking if mesh have flipped UV faces (wrong result would be shown as error message) |
| Texel Density | checking if mesh valid texel density |
| UV Set Names Order | checking the order of uv sets names |
| Exact UV Sets | check if objects have valid UV set names |
| No Name UV Sets | check UV sets for no name UV sets and rename for "map#order_num_uv_set" |
| UV Sets Count | check the count of uv sets |
| Material | |
| Name Pattern | check material names using regular expression |
| Name Prefix | check material names for allowed prefixes |
| Name Suffix | check material names for allowed suffixes |
| Allowed Types | check objects for allowed material types |
| Name Suffix | this check detects mesh without materials on them |
Blender
| Name | Brief description of checks |
|---|---|
| Scene | |
| Metric units | check the units in which you currently work in Blender |
| Object | |
| Name prefix | check object names for allowed prefixes |
| Name suffix | check object names for allowed for suffixes |
| No Modifiers | checking objects for modifiers |
| Transform | checking if objects have null transforms |
| Pivot Center | check that object pivot in the center of object |
| Pivot in World Origin | check that object pivot lie at world origin coordinates |
| Mesh | |
| Triangles Percentage | check how much triangle has mesh |
| Non-Planar Faces | checks for non-planar faces |
| N-Gons | checking geometry for n-gons |
| Non Manifolds | checks for invalid polygon geometry |
| Has No Soft Edges | check if mesh does not have mark sharped edges only (has at least one not marked sharp edge) |
| Zero Length Edges | checks for edges that are very short, within the specified tolerance |
| Zero Area Faces | checks for faces with area, within the specified tolerance |
| Concave Faces | checks for concave faces |
| Loose Geometry | checks the isolated elements on mesh |
| Duplicate Faces | checking geometry for duplicates of faces |
| Mapping | |
| Single UV Tile | checking if texture coordinates lie in one UV tile range (wrong result would be shown as error message) |
| Single UV Set | checking if mesh have more than one UV set |
| UV Sets Count | check the count of uv sets |
| Overlapped UV | checking if mesh have overlapped UV faces (wrong result would be shown as error message) |
| Flipped UV | checking if mesh have flipped UV faces (wrong result would be shown as error message) |
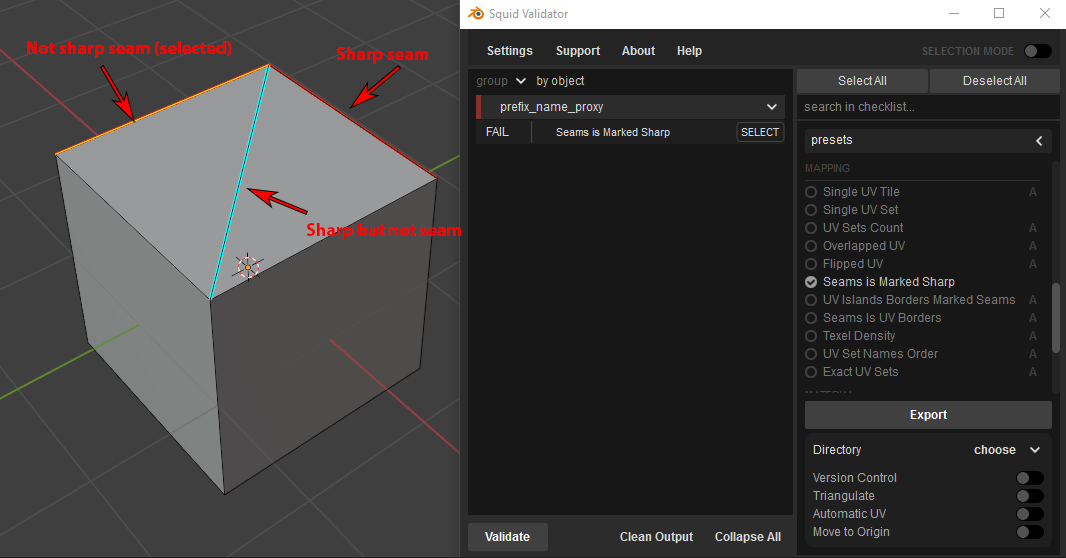
| Seams is Marked Sharp | this check gets all edges marked as sharp on the mesh and checks if they are represented as seam |
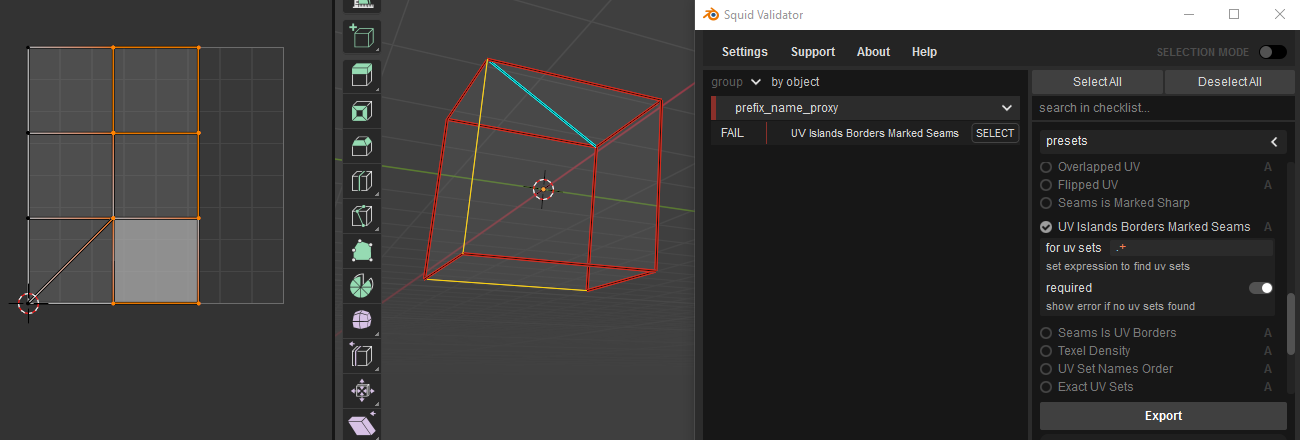
| UV Islands Borders Marked Seams | this check gets all UV borders of the mesh and checks if they are represented as sharp edges |
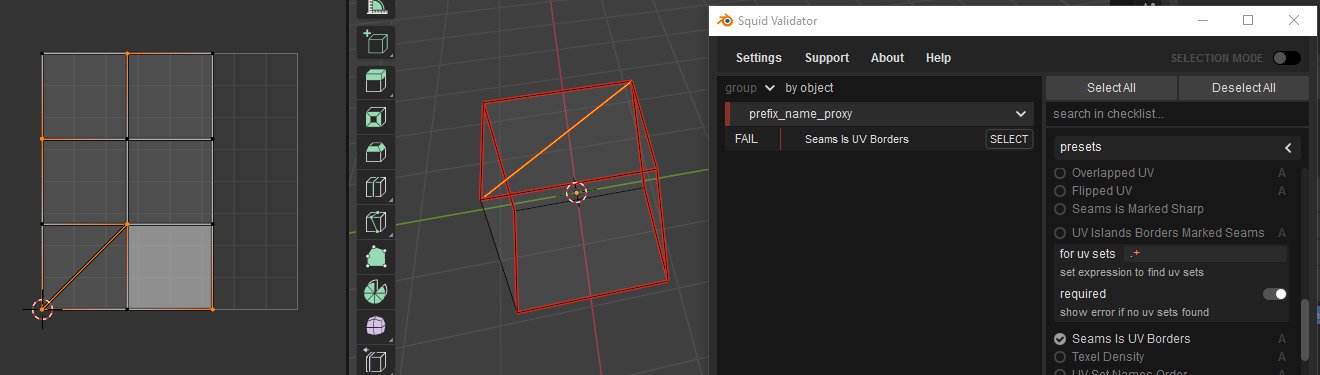
| Seams is UV Borders | this check all edges marked as seams is uv islands borders |
| Texel Density | checking if mesh valid texel density |
| UV Set Names Order | checking the order of uv sets names |
| Exact UV Sets | check if objects have valid UV set names |
| Material | |
| Name Pattern | check material names using regular expression |
| Name Prefix | check material names for allowed prefixes |
| Name Suffix | check material names for allowed suffixes |
| Allowed Types | check objects for allowed material types |
| No Material | this check detects polygons without materials on them |
| Empty Material | this check detects mesh with none type materials on them |
Update
- Enable “Check for newer versions” option in Settings
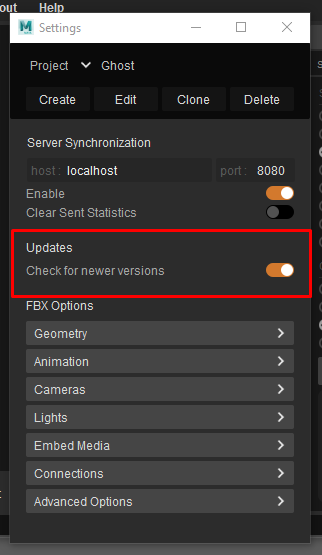
- After the new version release, there will be notification under “Validate” button
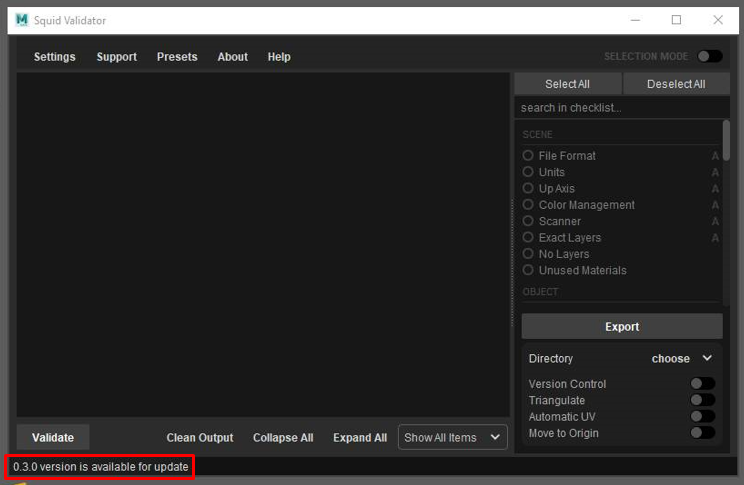
- Click on notification and download the latest version
- Remove previous version and install the new one
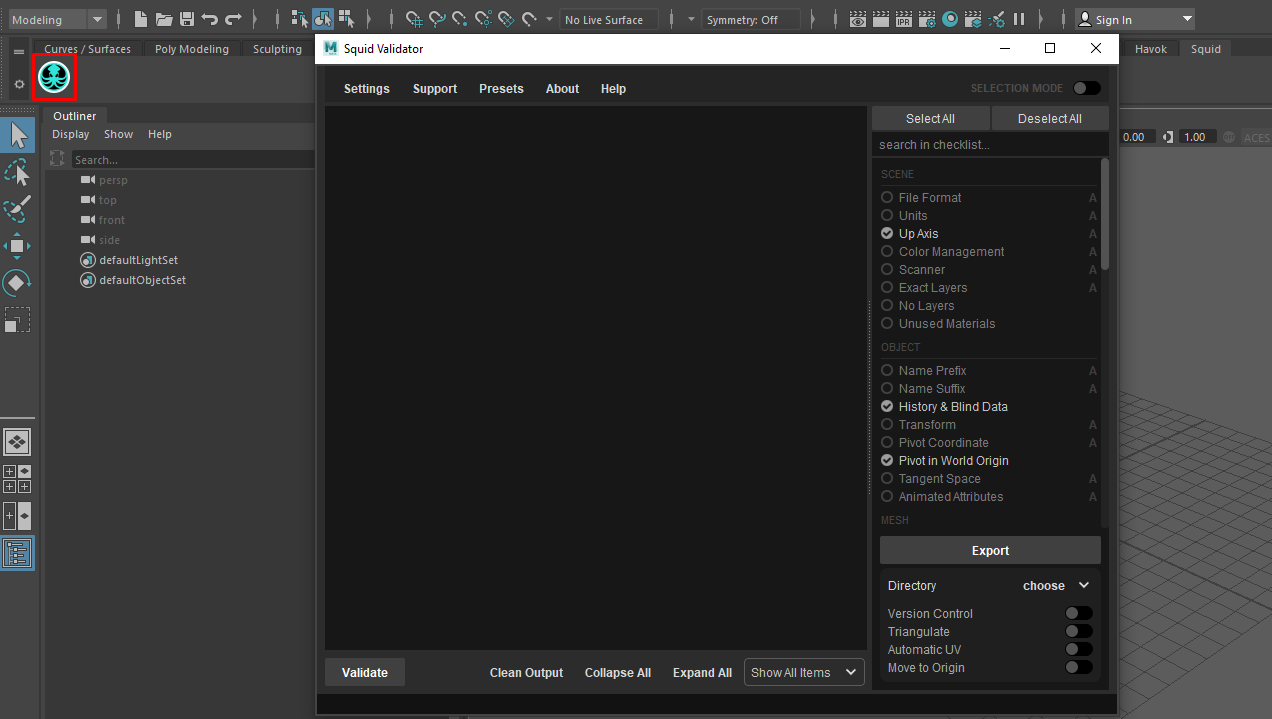
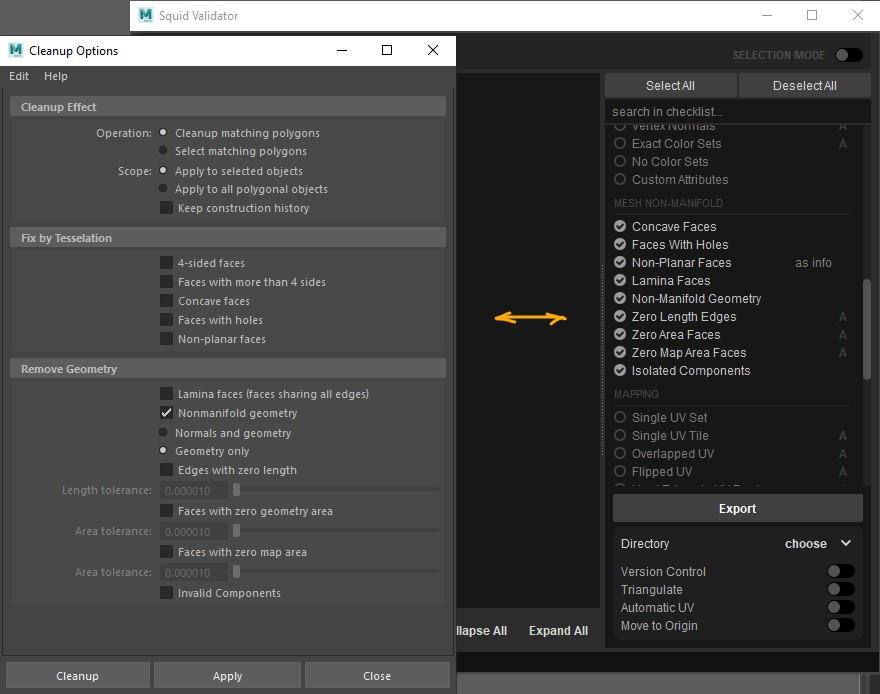
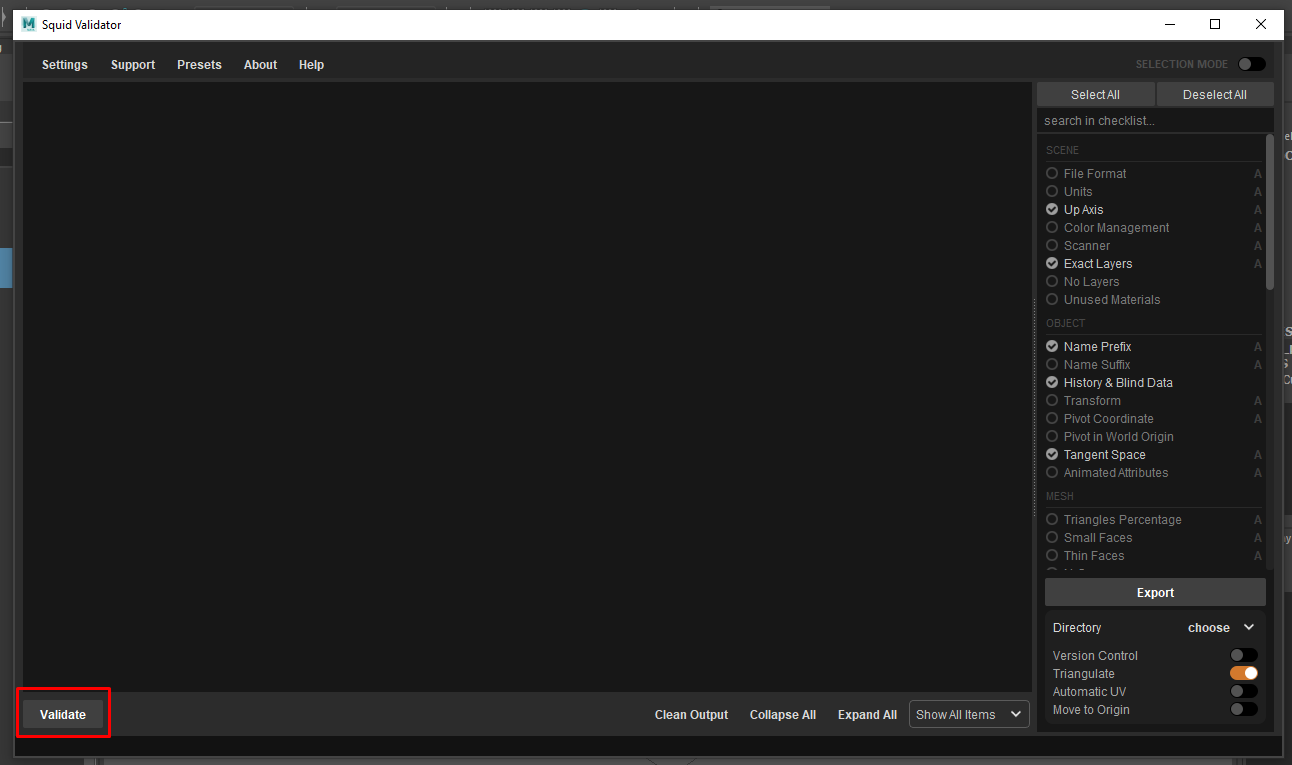
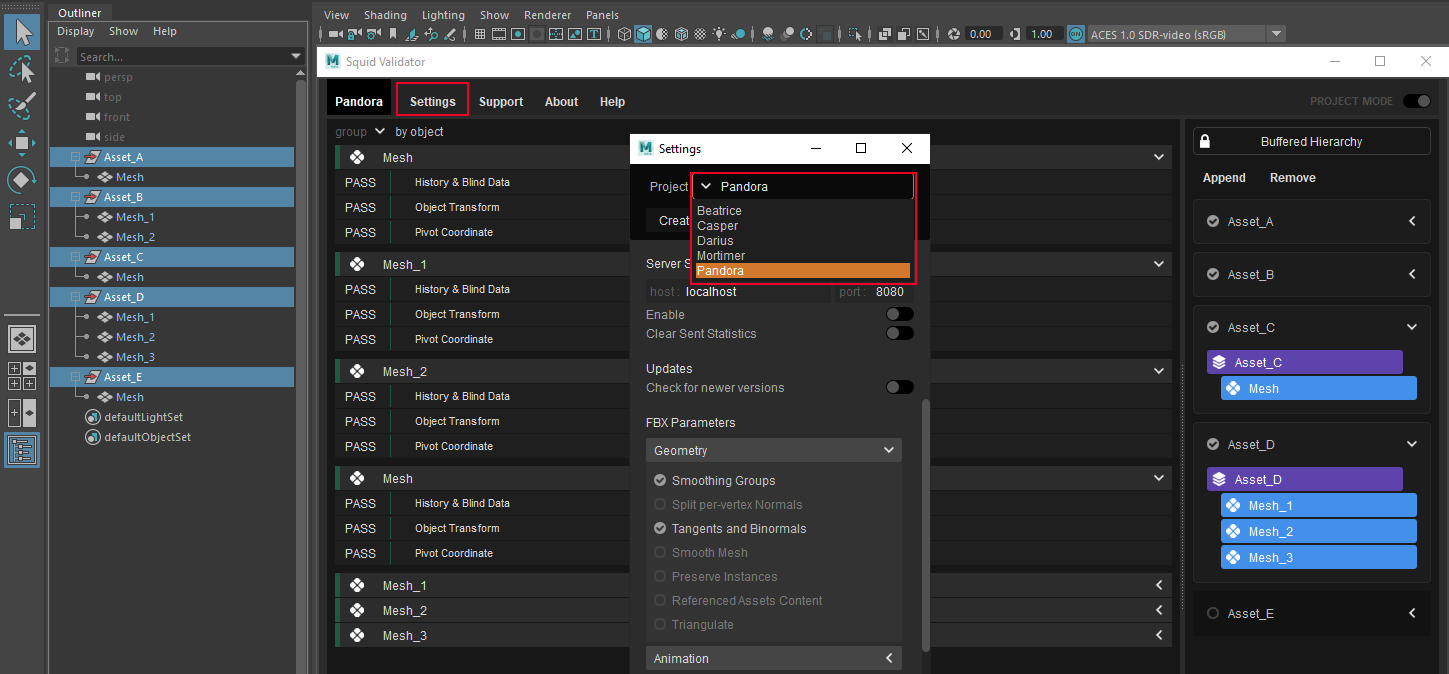
Main Interface
Project mode and Selection mode
There are two modes that are available for the SquidValidator: Selection mode and Project mode. In these modes, the main interface is slightly different.
The user can switch between these modes by clicking on the switcher on top right at the screen.
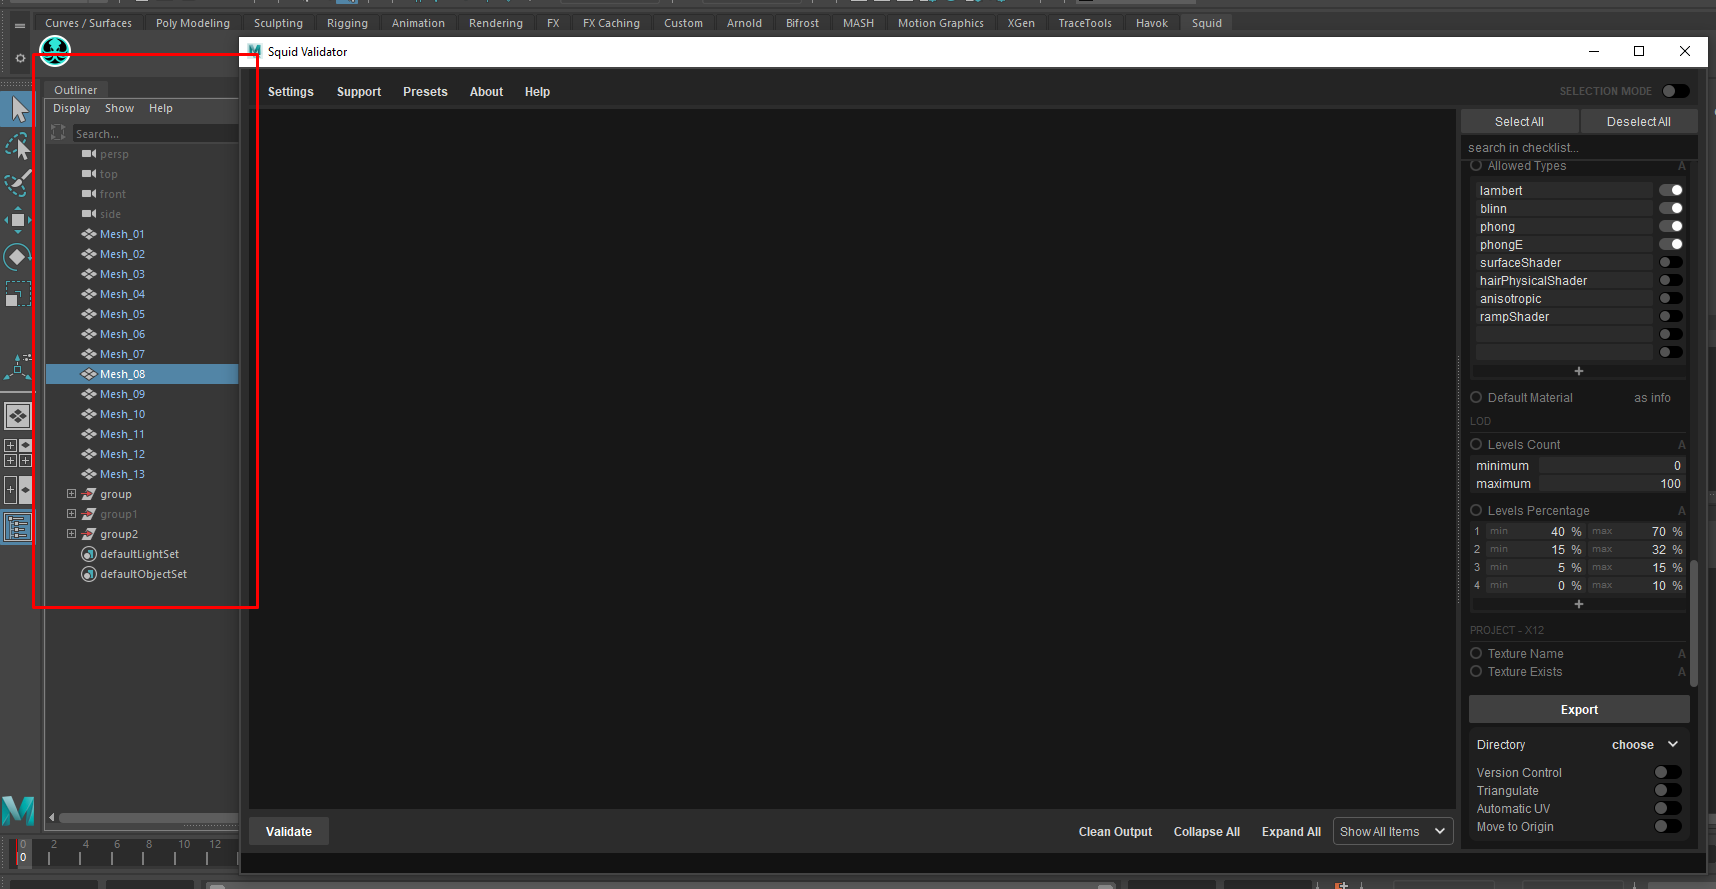
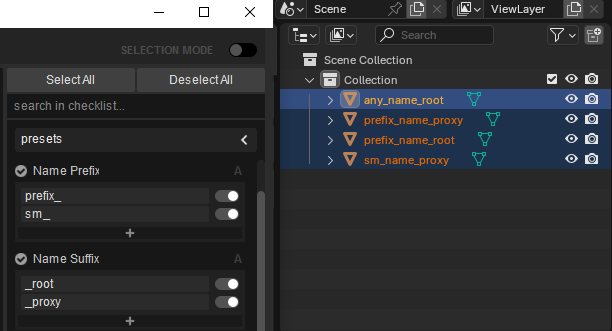
Selection Mode
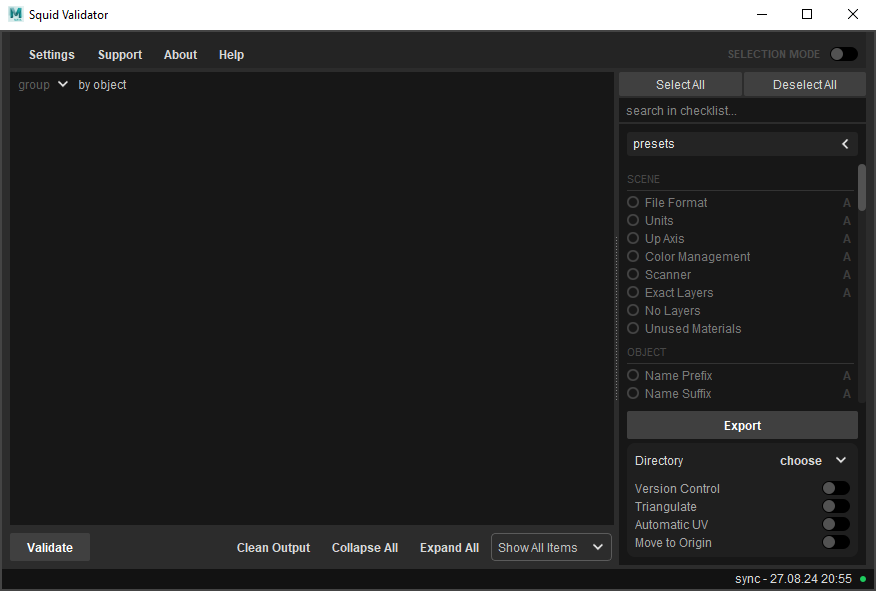
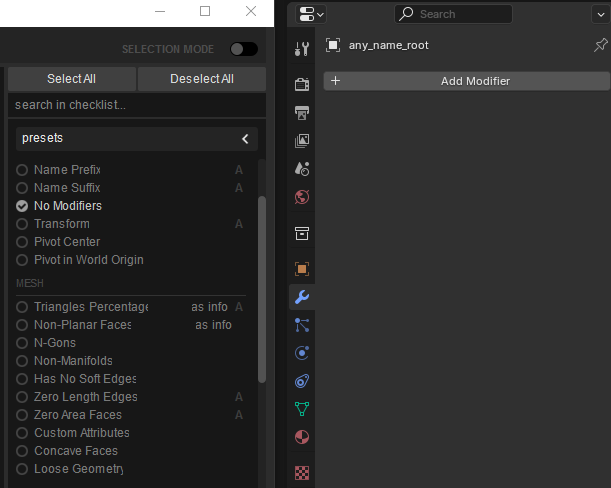
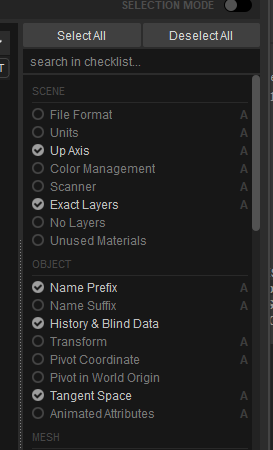
Selection mode allows the user to run a checks for selected object or objects in scene. In the right part of a screen the user can see list of the checks, search bar and two buttons.
“Select All” button selects all checks from the list.
“Deselect All” button deselects all checks.
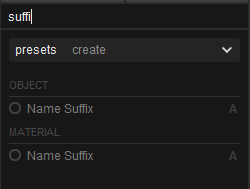
“Search in checklist” field allows the user to find check by its name.
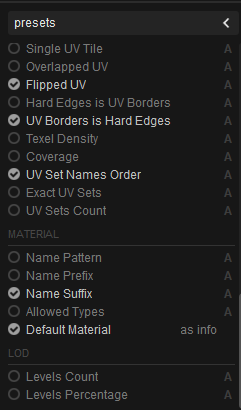
Presets widget allows the user to create, change, load and delete presets of checks. More information about presets can be found below.
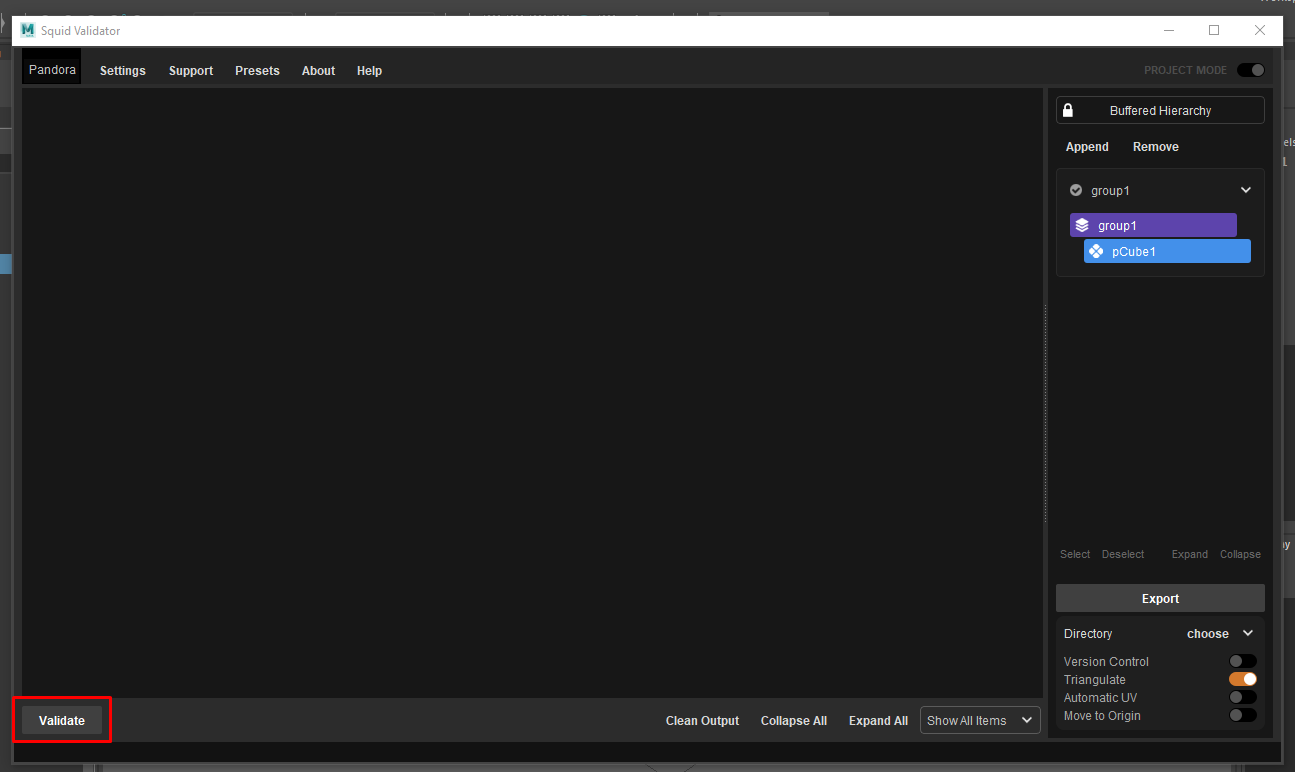
Project Mode
Project mode allows the user to load the predetermined hierarchy into the buffer and run predetermined checks for all objects in hierarchy. In the Project mode the user can see selected project on top left at the screen.
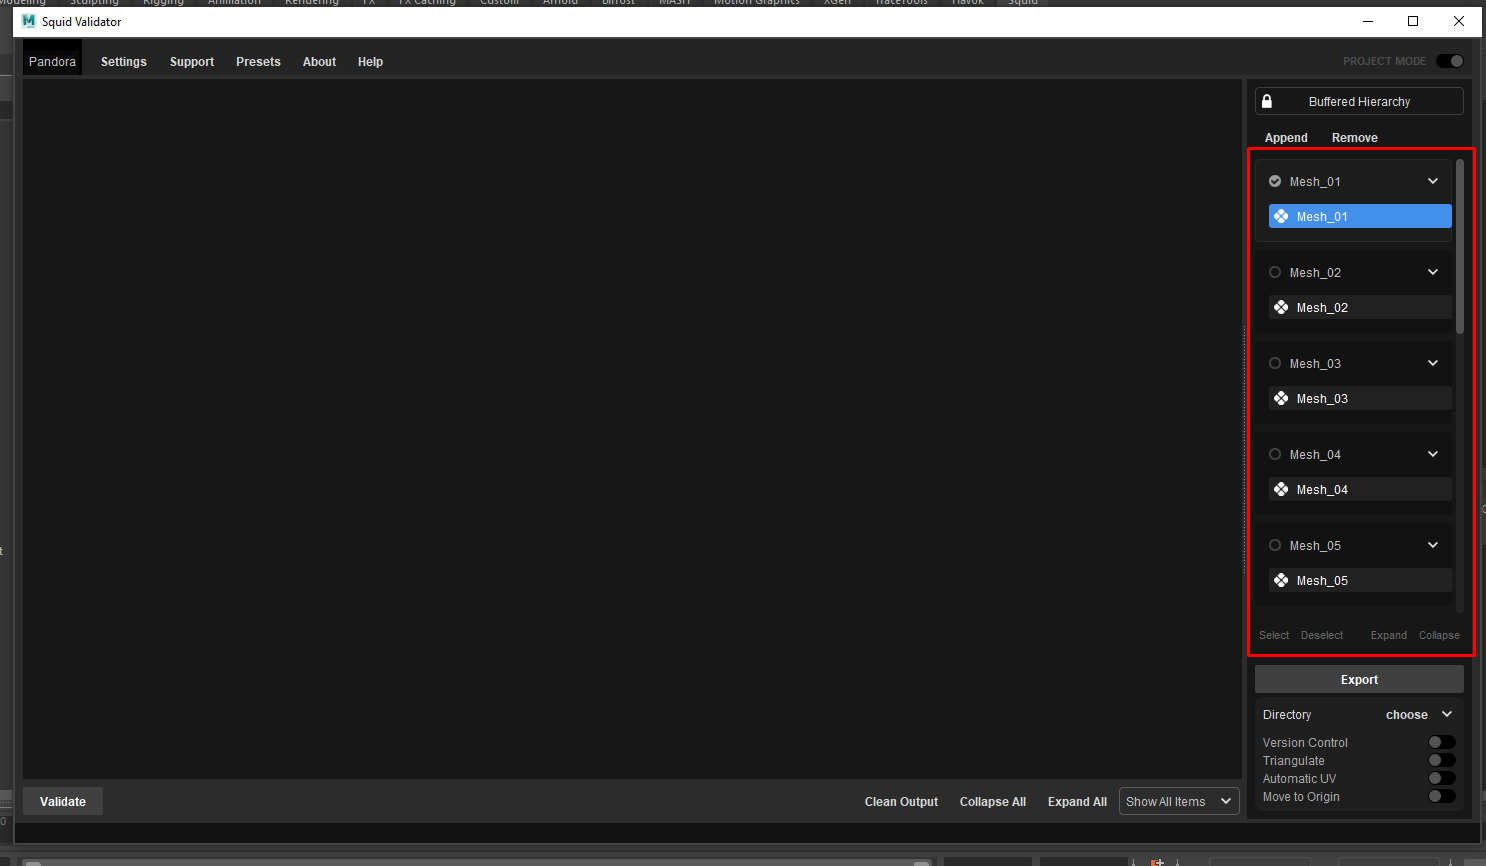
In contrast on Selection mode, the user can not see list of checks. In the project mode in the right part of the screen the user sees the Hierarchy tab with buttons Append and Remove
Button Get Hierarchy allows the user to load selected hierarchy from scene to the SquidValidator window.
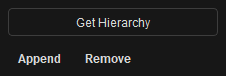
After hierarchy is loaded Get Hierarchy button changes to Buffered Hierarchy.
When the user hover Buffered Hierarchy button with a mouse, it changes to a Reload Hierarchy that allows the user to update hierarchy in the SquidValidator.
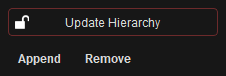
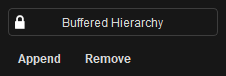
If there are some changes in the hierarchy in scene, button changes to the Update Hierarchy.
Append button add selected hierarchy to the Hierarchy tab. It is useful if some hierarchy is already loaded to the Hierarchy tab and the user need to add another object with the same structure.
Remove button removes selected hierarchy from the SquidValidator window.
Select button in the bottom part of the Hierarchy tab selects all objects loaded into the Hierarchy tab.
Deselect button deselects all objects.
Expand button expends all objects in Hierarchy tab. Collapse button collapses them.

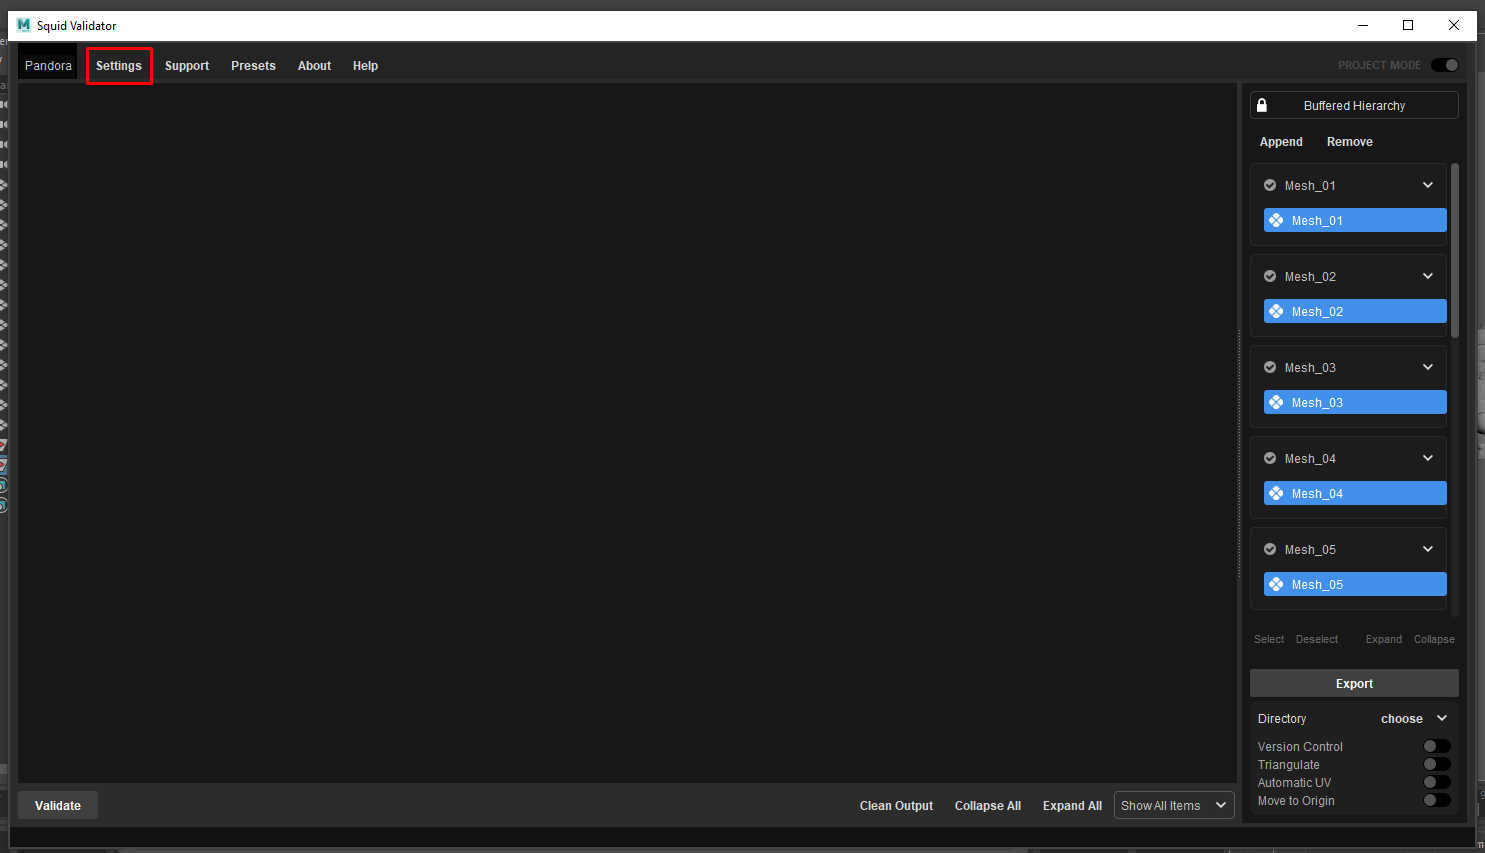
Settings button opens the Settings window, where the user can change project (in Project mode) or export settings.
Support button opens the Feedback page in the browser where the user can send some message to the support.
About button opens information about tools version and developers.

Help button opens the Documentation page in the browser where the user can find any necessary information.
Main Window
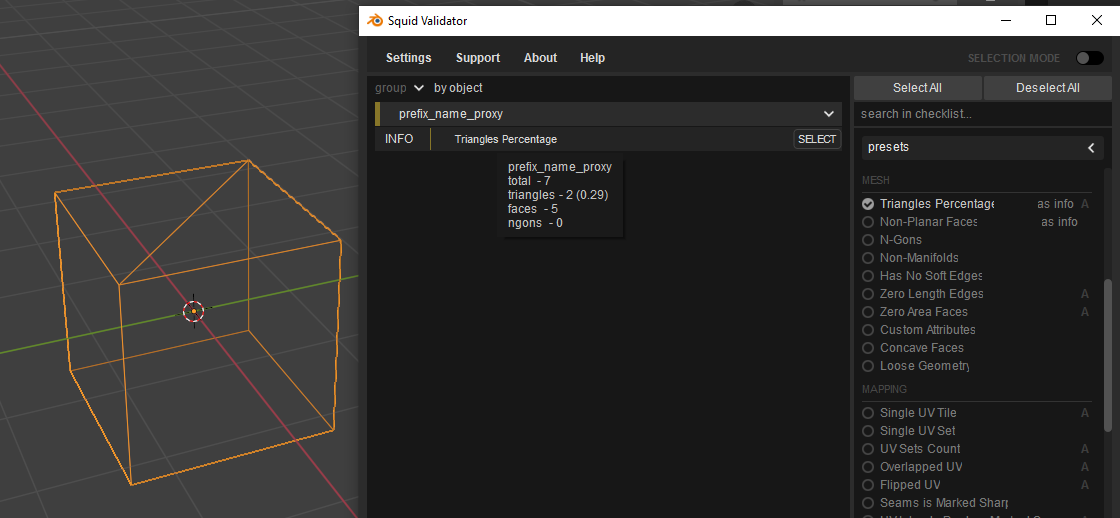
In the main window the user sees several buttons at the bottom of the screen and empty space if no checks was preformed or result of checks after they were completed.
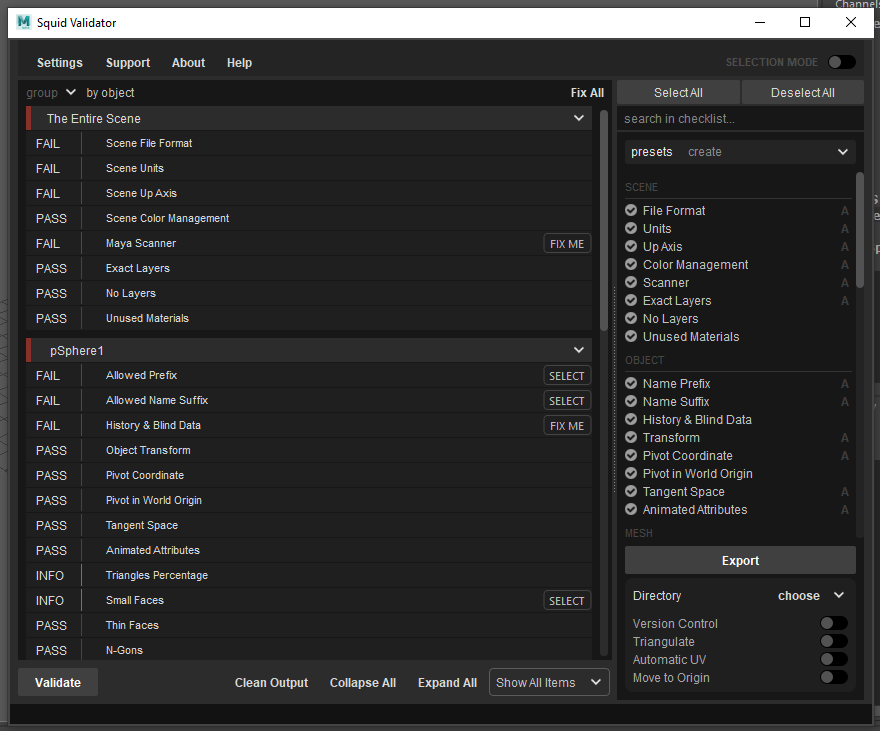
Validate button runs the selected checks for selected objects in scene in Selection mode or predetermined checks for the selected hierarchy in Project mode.
Clean Output button cleans the main screen.
Collapse All button collapses all results of the checks by object type.
Expand All button expands all results of the checks.
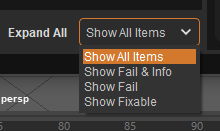
Drop-dow list with selected parameter Show All Items allows the user to filter the results of the checks by All results, Fail and Info, only Fail, Fixable.
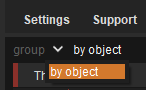
Group widget under the top menu allows the user to group and sort checks result by different types. Only “by object” option is available for now.
Also after performing the checks, if errors with the possibility of automatic correction were found, the “Fix All” button appears in the upper right corner of the screen.
Important Note: Editing an object after it has been validated will make the data shown in the check window outdated and may cause errors. You must revalidate any changes.
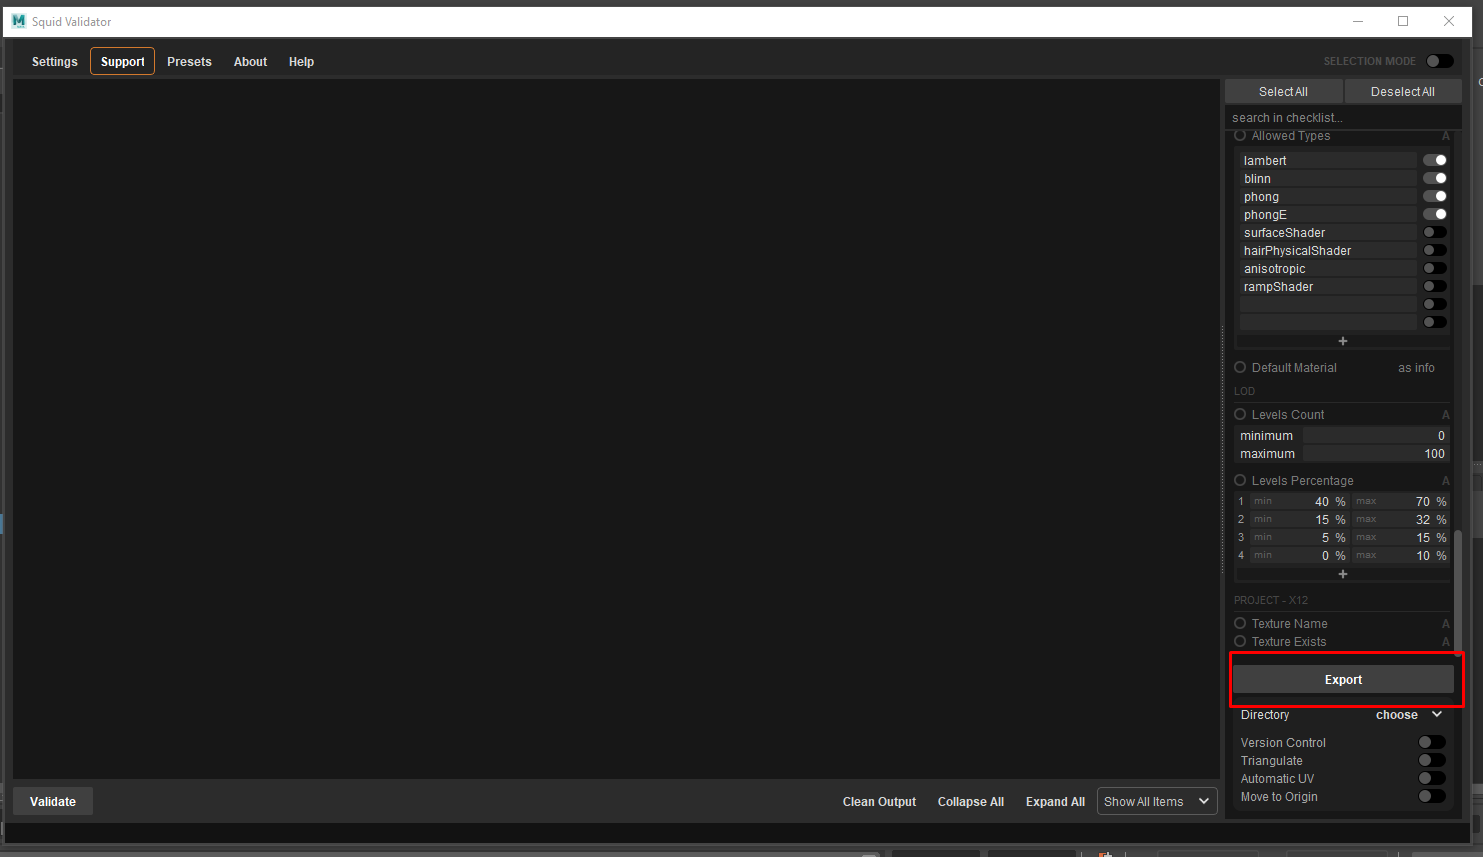
Export Tab
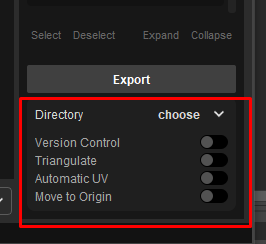
Export tab allows the user to select settings for export scene and directly export selected objects or hierarchy in FBX format.
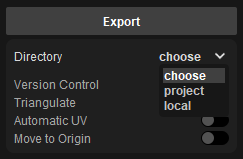
Directory drop-down list allows the user to choose, where he wants to save files.
Choose - the user can choose directory after pressing the Export button.
Project - saves to the directory specified in the project settings.
Local - saves to the same folder with the current scene.
Version control option when enabled adds numbering to the exported file name (for example filename.v0001.fbx). If this option is disabled, Maya overwrite the previous version of file after re-exporting.
Triangulate option when enabled applies the Mesh → Triangulate function to the exported geometry without affecting geometry on scene.
Automatic UV option when enabled applies the UV → Automatic function to the exported geometry without affecting geometry on scene.
Move to Origin option when enabled temporarily sets the position attributes to zero before exporting.
Settings
To open Settings window click on the “Settings” button at top tart of the screen.
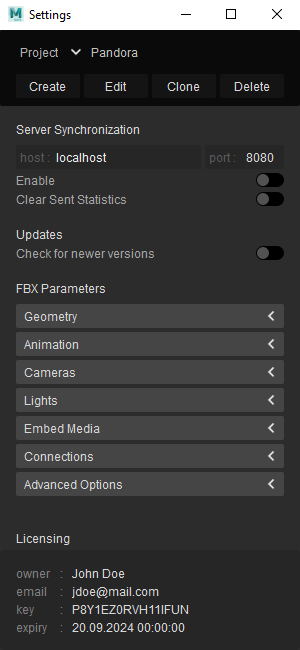
Project Settings
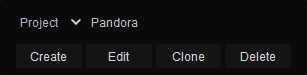
Project settings are available only in Project mode and allows the user to select the project, create a new one, edit, clone or delete the current project.
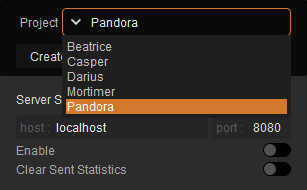
Project drop-down list represents all project, that are available on the server.
When the version of the project is incompatible for current Squid validator version, the user will see information about it and won’t be able to load, edit or delete this project.

Create button opens the Project Editor window without hierarchy.
Edit button opens Project editor with hierarchy of the current project

Clone button opens Project Editor window to create a new project with the copy hierarchy and patterns from the selected project
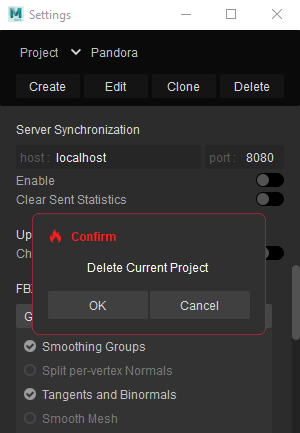
Delete button deletes current project
Server Synchronization
Synchronization with the server allows the user to load and synchronize projects.
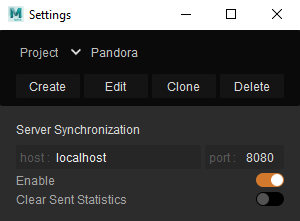
It consist from host address, port number, enable option and clear sent statistics option.
When the user launch SquidValidator for the first time, he needs to enable server synchronization to load existing projects.
You are able to run your own synchronization server to share projects. For further information, see share-server page.
Updates
The “Check for newer versions” function allows the user to receive notification about new versions of Sqiud Validator.

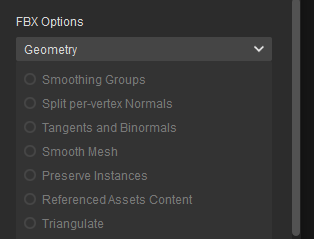
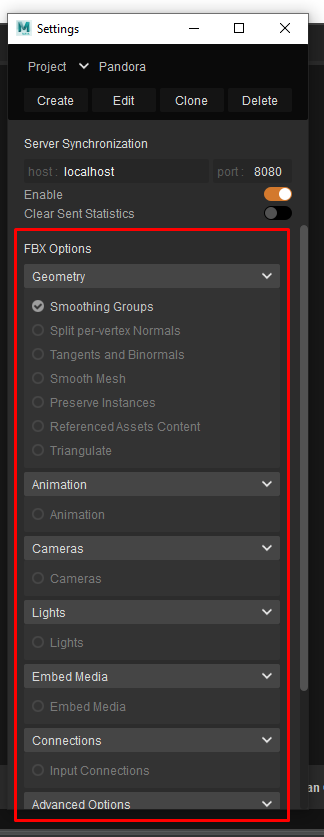
FBX Parameters
FBX parameters are the options that are used to export files. They are divided into several categories.
Maya
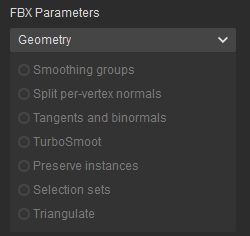
Geometry
Smoothing Groups
When this option is activated the Maya FBX plug-in converts edge information to Smoothing Groups and exports them with the file.
When this option is disabled, no edge information is converted to Smoothing Groups.
Split per-vertex Normals
Activate this option to split geometry vertex normals based on edge continuity. Vertex normals determine the visual smoothing between polygon faces. They reflect how Maya renders the polygons in smooth shaded mode.
Use this option to keep the same hard/soft edge look that you get from Maya in MotionBuilder.
Do not use this option if you do not require hard edges in MotionBuilder, since this operation duplicates vertex information and converts the geometry itself. You can use the Combine per-vertex Normals option in the FBX Importer to perform the inverse operation, but this may result in incorrect UV texture maps, see the note that follows this entry.
Exporting with the Split per-vertex Normals option disabled produces the following result in MotionBuilder 2010 and earlier:
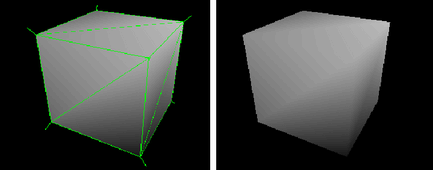
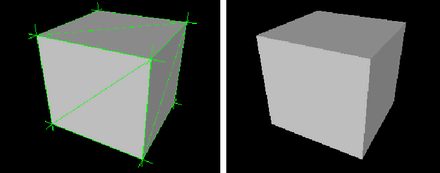
Exporting with the Split per-vertex Normals option activated produces the following result in MotionBuilder:
Tangents and Binormals
Activate this option if you want the Maya FBX plug-in to create tangents and binormals data from UV and Normal information of meshes. This way you have a tangent space representation of your meshes that you can use for advanced rendering.
Smooth Mesh
The Smooth Mesh option lets the user exports source mesh with Smooth mesh attributes. To export the source mesh, disable the Smooth mesh Preview attribute in Maya, and then export.
If you activate the Smooth Mesh option, the mesh is not tessellated, and the source is exported with Smooth Mesh data. If you disable the Smooth Mesh option, the mesh is tessellated and exported without Smooth Mesh data.
Preserve Instances
Activate the Preserve Instances option to retain Maya instances in the FBX export. If this option is disabled, instances are converted to objects.
Referenced Asset Content
Activate the Referenced Asset Content option so that the referenced asset is exported, along with its contents. In other words, containers are exported with any data associated with them. If you activate the Referenced Asset Content option, your references instead become objects in the exported FBX file.
Triangulate
This option automatically tessellates exported polygon geometry.
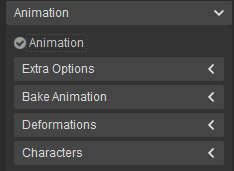
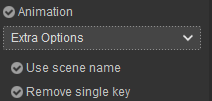
Animation
Activate this option to access advanced animation options and features.
Extra Options
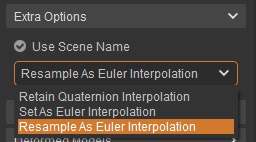
Use scene name
Normally, the Maya FBX plug-in saves Maya scene animation in the FBX file as Take 001. If you want the scene animation to instead be named for the Maya scene, activate this option.
Resample as Euler interpolation
This is the default conversion setting for quaternion interpolations.
This option converts and resamples quaternion interpolations into Euler curves to ensure interoperability.
Retain quaternion interpolation
This option retains quaternion interpolation types during the export process.
Set as Euler interpolation
This option changes the interpolation type of quaternion keys to a Euler type, without resampling the animation curves themselves.
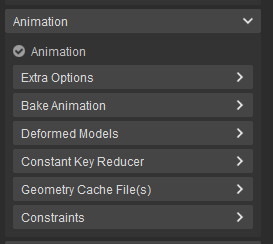
Bake Animation

Bake animation
This bakes all unsupported constraints, including Maya-supported and FBX constraints, into animation curves. You can then import these curves into another application that does not support these Maya constraints.
By default the Maya FBX plug-in takes the Start and End values automatically from the current Timeline settings of the host application. You can manually enter in a custom start, end, and step value to bake a specific section of time.
Resample All
Use the Resample All option to bake even the supported animated elements. This is unlike the Bake Animation option which selectively bakes unsupported elements only.
Deformed Models
Activate the Deformed Models option to export Skin and Blend Shape deformations.
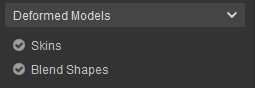
Skins
Activate this option to export all skin deformation into your scene.
Blend Shapes
Activate this option to export all geometry Blend Shapes used in your scene.
Constant Key Reducer
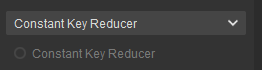
Activate the Constant Key Reducer filter to remove redundant keys. Redundant keys are keys that have the same value, which are equivalent to flat horizontal interpolations on a curve.
Geometry cache file(s)
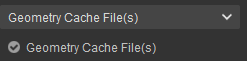
Activate this option to create a geometry cache file of a chosen selection set. To use this option, create a selection set of the objects for which you want to retain the vertex animation in Maya. Use this option when you export nCloth deformations on an object to 3ds Max.
Constraints
Activate this option to ensure that certain supported constraints are exported to FBX.
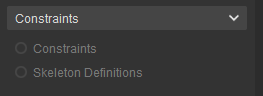
Constraints
FBX supported constraints include:
-
Point
-
Aim
-
Orient
-
Parent
-
IK handle (including Pole Vector)
This option lets you export your constraints effectively without the need to bake the animation first, if you are transferring to a package that which supports these constraints, like MotionBuilder.
Skeleton definitions
Activate this option to include your Skeleton definitions (FBIK/HumanIK) in the file on export. This can be useful if you are transferring to MotionBuilder, which also supports characters.
Cameras
Activate this option to export all cameras contained in the scene.
The Maya FBX plug-in exports camera settings, but not render settings associated to the camera with the file.
Lights
Activate this option to export all lights contained in the file. The Maya FBX plug-in exports and converts light types to ensure FBX interoperability.
The Maya FBX plug-in supports Standard Point, Spot, and Directional light types exported to FBX for Autodesk 3ds Max, Autodesk MotionBuilder, and other Autodesk applications.
Embed Media
Activate this option to include (or embed) all media associated with your scene in the FBX file itself. For example, texture images.
The Maya FBX plug-in copies the embedded media to a <fileName>.fbm folder in the same location as the FBX file and is named after the FBX file. Since this media is contained within the FBX file itself, this has an impact on file size. Therefore, use this option only when you transport an FBX file to a location where the original media source is no longer accessible by the receiver.
Embed your media to ensure that all your textures are carried over and loaded when you open the FBX file on another computer. You do not need to do this if you are working on a local machine or over a network database that ensures that the paths to media are not changing.
Connections
Input Connections
This option causes the Maya FBX plug-in to export selected objects without automatically exporting all related input connections. In Maya, when you do an export selection to FBX, the Input Connections option appears in the Maya FBX Exporter.
If this option is disabled, no input connections associated with the selected object are exported during the export selection operation. If the option is active, however, all associated input connections to the selected object are exported.
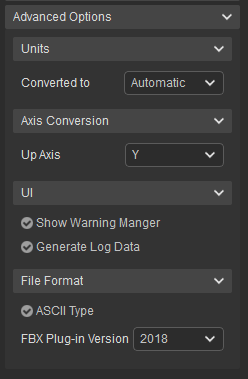
Advanced Options
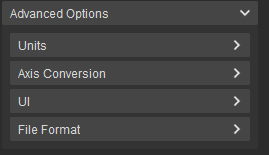
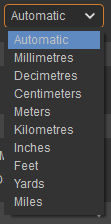
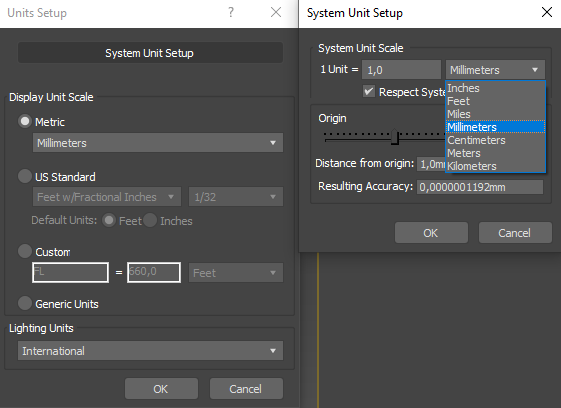
Units
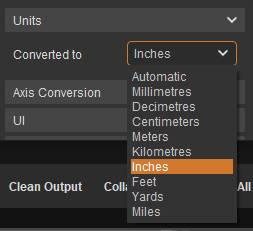
The Units option lets you view the conversion factor (scaling value) the plug-in uses as well as modify the conversion units.
Note: This does not change the System unit settings in Maya.
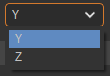
Axis conversion
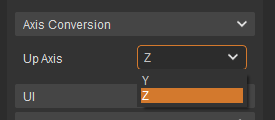
The Maya FBX Exporter has two options for Axis Conversion in the UI. Y-up, or Z-up.
By default, the FBX Exporter always exports the Up Axis of the Host application.
UI
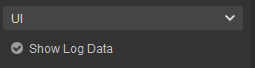
These options let you set display options of the UI. This lets you show or hide the Warning Manager and FBX UI windows.
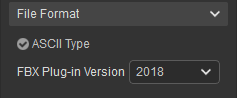
File format
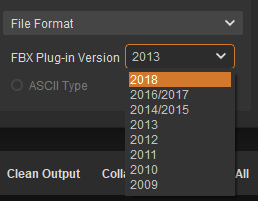
FBX Plug-in Version
Expand the FBX Version to specify an FBX version to use for export. This setting defaults to the latest version of the FBX plug-in installed.
Change this option only when you want to import your file using an older plug-in version; where the source plug-in version and destination plug-in version do not match.
ASCII Type
Activate this option to save the FBX file in ASCII format.
3ds Max
Geometry
Smoothing Groups
Activate this option when you want to include Smoothing Groups information in your exported FBX scenes.
When this option is disabled, no edge information is converted to Smoothing Groups.
Split per-vertex Normals
Activate this option in order to split geometry vertex Normals based on edge continuity.
This option only applies to older MotionBuilder workflows so you can ensure visual fidelity of surface continuity. It lets you transfer hard edge information to MotionBuilder. This transfer is required because of a MotionBuilder limitation found in versions 2010 and earlier.
Exporting with the Split per-vertex Normals option disabled produces the following result in MotionBuilder 2010 and earlier:
Exporting with the Split per-vertex Normals option activated produces the following result in MotionBuilder:
Tangents and Binormals
Activate this option if you want the 3ds Max FBX plug-in to create Tangents and Binormals data from UV and Normal information of meshes. This way you have a Tangent space representation of your meshes that you can use for advanced rendering.
TurboSmooth
Use TurboSmooth to export the source mesh (non-tessellated version) and the TurboSmooth attributes, for objects with an active TurboSmooth modifier applied.
If you disable this option, the tessellated version of the mesh is exported. To export the source mesh, turn off the TurboSmooth modifier in 3ds Max, and export.
Preserve Instances
Activate the Preserve Instances option to preserve instances in the FBX export. If you disable this option, exported instances are made unique (converted to copies).
When you activate Preserve Instances, 3ds Max reference objects export to FBX as a copy (not an instance). The Reference objects then lose their instancing properties.
Selection Sets
Objects and all Editable Poly/Mesh & Poly/Mesh Select modifier sub-object (component) selection sets are supported for export and import with the 3ds Max FBX plug-in.
Activate this option to export Selection sets. Disable this option if you do not want Selection Sets exported with your file. This option is disabled by default.
To avoid name clashing, the 3ds Max FBX plug-in must rename Sub-object Named Selection sets on export. This is because the 3ds Max FBX plug-in does not distinguish between edges and borders, or polygons and elements.
Because borders contain edges, and elements contain polygons, FBX must identify these Sub-objects and add a suffix.
For example, if you had a Sub-object Named selection set of one vertex called “OneVertex” that belonged to Box01, on export it becomes renamed “Box01_OneVertex”.
Triangulate
This option automatically tessellates exported polygon geometry.
This option affects polygon Meshes, not NURBS and Patches.
Animation
Extra Options
Use Scene Name
Normally, the 3ds Max FBX plug-in saves the 3ds Max scene animation in the FBX file as Take 001. Activate this option if you want the scene animation to be named after the 3ds Max scene instead.
Remove Single Key
When you activate this setting, the exporter removes keys from objects on export if the plug-in determines that the animation has only one key. When two or more keys exist in the file, the keys are exported.
Bake Animation

This option lets you bake (or Plot) animation at export time.
When you activate this option all unsupported constraints and controllers, including the 3ds Max Biped, are resampled into animation curves. You can then import these curves into another application that does not support these 3ds Max constraints.
The plug-in takes the Start and End values automatically from the “timeline” current settings of the host application. You can modify them by changing the values once you activate this option.
Resample All
Use the Resample all option to bake even supported animated elements. This is unlike the Bake Animation option which selectively bakes unsupported elements only.
The Resample all option resamples animation using the frame rate of the host application. If you want the Resample all option to use a different frame rate for sampling, you must specify another frame rate setting in 3ds Max.
The Resample all option reacts to the state of the Bake animation option. If the Bake Animation option is disabled, the Resample all option is unavailable.
Deformations

Morphs
Activate this option to export all geometry Morphs used in your scene.
Skins
Activate this option to export all Skin deformations used in your scene.
Characters
CAT Characters as HIK
Activate the CAT Characters as HIK option when you want export your CAT rig as an HIK Skeleton Definition to an FBX file.
If this option is disabled, the CAT rig is exported as a skeleton with standard bones.
Cameras
Activate this option to export all cameras contained in the scene.
The plug-in exports camera settings, and some render settings. Activating the Cameras option can change rendering results depending on the source application used in comparison. When you export, 3ds Max cameras are converted into FBX camera types for interoperability. The plug-in supports camera settings and converts them.
Lights
Activate this option to export all lights contained in the file. The 3ds Max FBX plug-in exports and converts light types to ensure FBX interoperability.
The 3ds Max FBX plug-in supports Standard Point, Spot and Directional light types exported to FBX for Autodesk Maya, Autodesk MotionBuilder, and other Autodesk applications.
Embed Media
Activate this option to include (or embed) all media associated with your scene in the FBX file itself. For example, texture images.
When you activate “Embed Media”, the FBX plug-in includes (embeds) associated media (textures, for example) within the FBX file. The plug-in then extracts the media to an .fbm folder at import. The plug-in copies the embedded media to a <fileName>.fbm folder in the same location as the FBX file and is named after the FBX file. Since this media is contained within the FBX file itself, this has an impact on file size. Therefore, it is good practice to use this option only when you transport an FBX file to a location where the original media source is no longer accessible by the receiver.
Advanced Options
Units
Activate the Automatic option if you want the 3ds Max FBX plug-in to automatically identify and set the units of the destination file to match units of the host application
Axis conversion
The FBX export plug-ins have two options for Axis Conversion, Y-up, or Z-up.
UI

Show Warning Manager
This option lets you enable the Warnings and Errors dialog box that appears during the export process.
Generate Log Data
Deactivate the Generate log data option if you do not want warning and error information written to the log. However, if you deactivate this option, the FBX Exporter/Importer records the file name and time stamp in the log file, but does not include error and warning data.
File Format
ASCII Type
Activate this option to save the FBX file in ASCII format. Deactivate for Binary.
FBX Plug-in Version
Expand the FBX Version menu to select an FBX version.
The following table lists the different versions available for you to select from the FBX exporter.
Blender
File
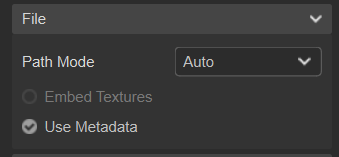
Path Mode
When referencing paths in exported files you may want some control as to the method used since absolute paths may only be correct on your own system. Relative paths, on the other hand, are more portable but mean that you have to keep your files grouped when moving about on your local file system. In some cases, the path doesn’t matter since the target application will search a set of predefined paths anyway so you have the option to strip the path too.
|
Auto: |
Uses relative paths for files which are in a subdirectory of the exported location, absolute for any directories outside that. |
|---|---|
|
Absolute: |
Uses full paths. |
|
Relative: |
Uses relative paths in every case (except when on a different drive on windows). |
|
Match: |
Uses relative / absolute paths based on the paths used in Blender. |
|
Strip Path: |
Only write the filename and omit the path component. |
|
Copy: |
Copy the file on exporting and reference it with a relative path. |
Embed Textures
Embed textures in FBX binary file (only for “Copy” path mode!)
Include
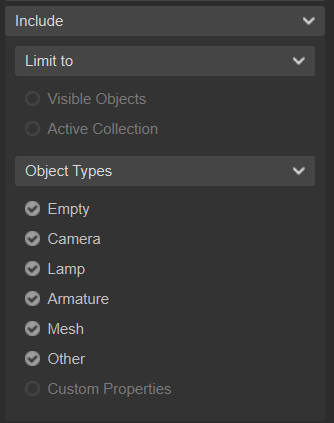
In these options you can select your preferred object types and active elements:
-
Active elements:
-
Visible Objects
-
Active Collections
-
-
Object types:
-
Empty
-
Camera
-
Lamp
-
Armature
-
Mesh
-
Other
-
Custom Properties
-
Transform
Scale
Scale the exported data by this value. 1.0 is the default because this fits best with the scale most applications import FBX to.
Apply Scaling
How to apply custom and units scalings in generated FBX file (Blender uses FBX scale to detect units on import, but many other applications do not handle the same way)
-
All Local – Apply custom scaling and units scaling to each object transformation, FBX scale remains at 1.0.
-
FBX Units Scale – Apply custom scaling to each object transformation, and units scaling to FBX scale.
-
FBX Custom Scale – Apply custom scaling to FBX scale, and units scaling to each object transformation.
-
FBX All – Apply custom scaling and units scaling to FBX scale.
Forward / Up
Since many applications use a different axis for ‘Up’, these are axis conversions for Forward and Up axes – By mapping these to different axes you can convert rotations between applications default up and forward axes.
Blender uses Y Forward, Z Up (since the front view looks along the +Y direction). For example, its common for applications to use Y as the up axis, in that case -Z Forward, Y Up is needed.
Apply Unit
Take into account current Blender units settings.
Apply Transform
Apply transformations.
Geometry
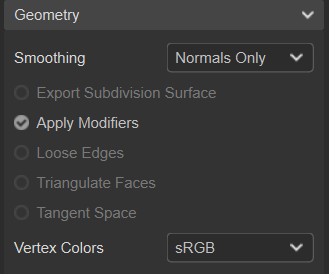
Smoothing
Export smoothing information (prefer ‘Normals Only’ option if your target importer understand split normals)
-
Normals Only – Export only normals instead of writing edge or face smoothing data.
-
Face – Write face smoothing.
-
Edge – Write edge smoothing.
Export Subdivision Surface
Export the last Catmull-Rom subdivision modifier as FBX subdivision (does not apply the modifier even if ‘Apply Modifiers’ is enabled)
Apply Modifiers
Export objects using the evaluated mesh, meaning the resulting mesh after all modifiers have been calculated.
Loose Edges
Export loose edges (as two-vertices polygons)
Triangualte Faces
Convert all faces to triangles.
Tangent Space
Add binormal and tangent vectors, together with normal they form the tangent space (will only work correctly with tris/quads only meshes!)
Armature
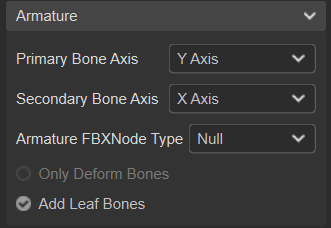
Primary/Secondary Bone Axis
Choose axis for bones
Armature FBXNode Type
FBX type of node (object) used to represent Blender’s armatures (use the Null type unless you experience issues with the other app, as other choices may not import back perfectly into Blender…)
Only Deform Bones
Only write deforming bones (and non-deforming ones when they have deforming children)
Add Leaf Bones
Append a final bone to the end of each chain to specify last bone length (use this when you intend to edit the armature from exported data)
Animation
Activate this option to access advanced animation options and features.
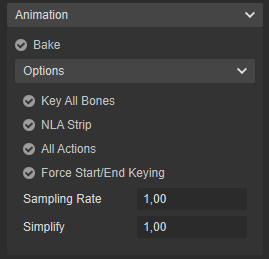
Bake
Export baked keyframe animation
Key All Bones
Force exporting at least one key of animation for all bones (needed with some target applications, like UE4)
NLA Strips
Export each non-muted NLA strip as a separated FBX’s AnimStack, if any, instead of global scene animation
All Actions
Export all actions compatible with the selected armatures start/end times which are derived from the keyframe range of each action. When disabled only the currently assigned action is exported.
Force Start/End Keying
Always add a keyframe at start and end of actions for animated channels
Sampling Rate
How often to evaluate animated values (in frames)
Simplify
How much to simplify baked values (0.0 to disable, the higher the more simplified)
Export Options
These are used to one-click export assets with predefined settings here. Options depend on software where you export from, so they contain the same parameters as the embedded exporter.
How to export objects
First of all, the user needs to open Maya scene and the Squid Validator.
- Open the Settings window
- Expand FBX Option settings and select needed options
- Close the settings window
- Look at the Export tab and select needed options
- Select objects for export
-
a. In the Project mode select at least one hierarchy from the list
-
b. In the Selection mode select at least one object on scene or Outliner window
-
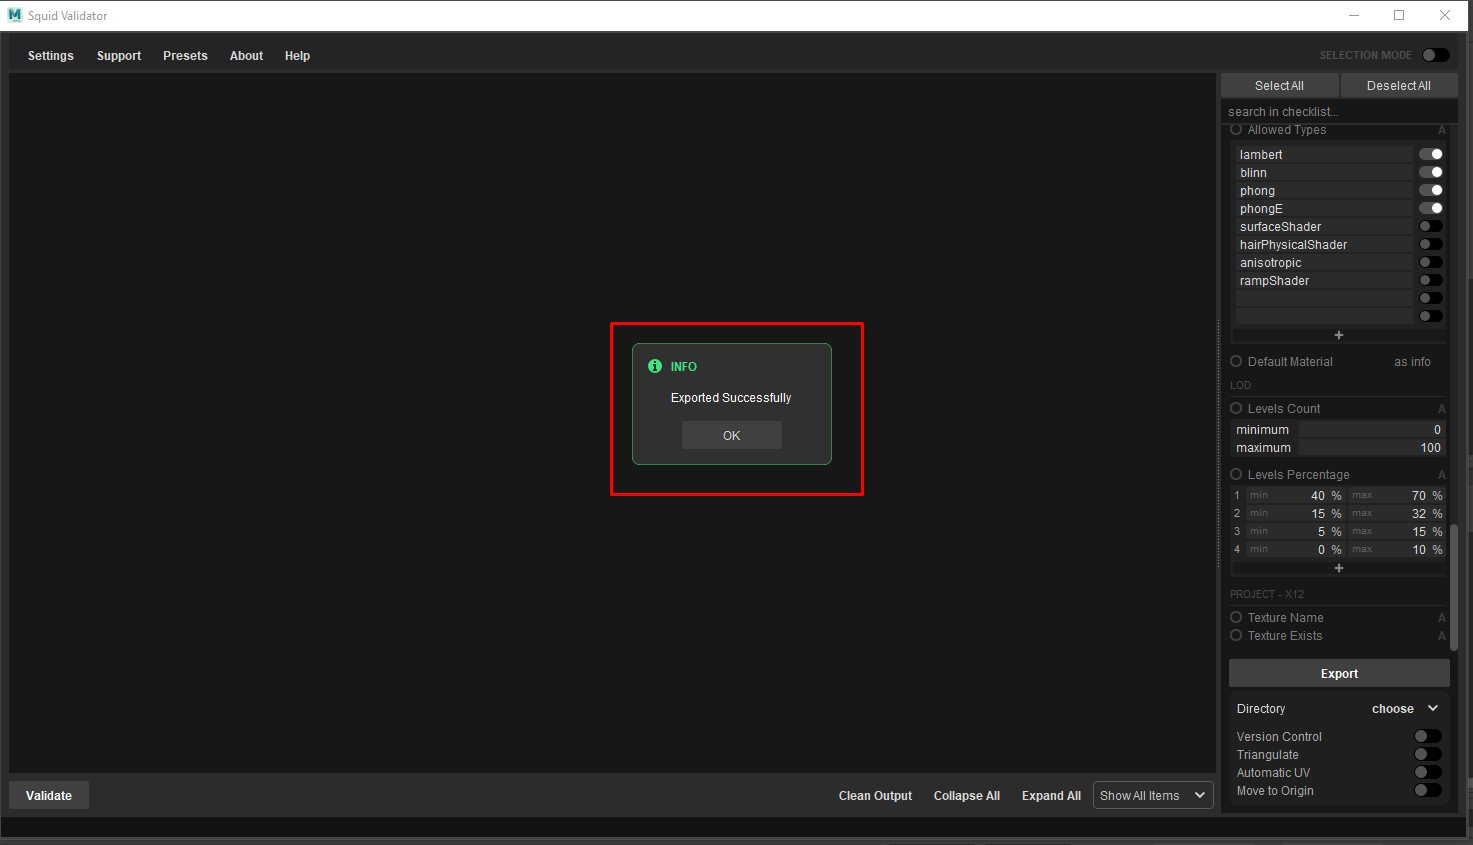
- Press the “Export” button
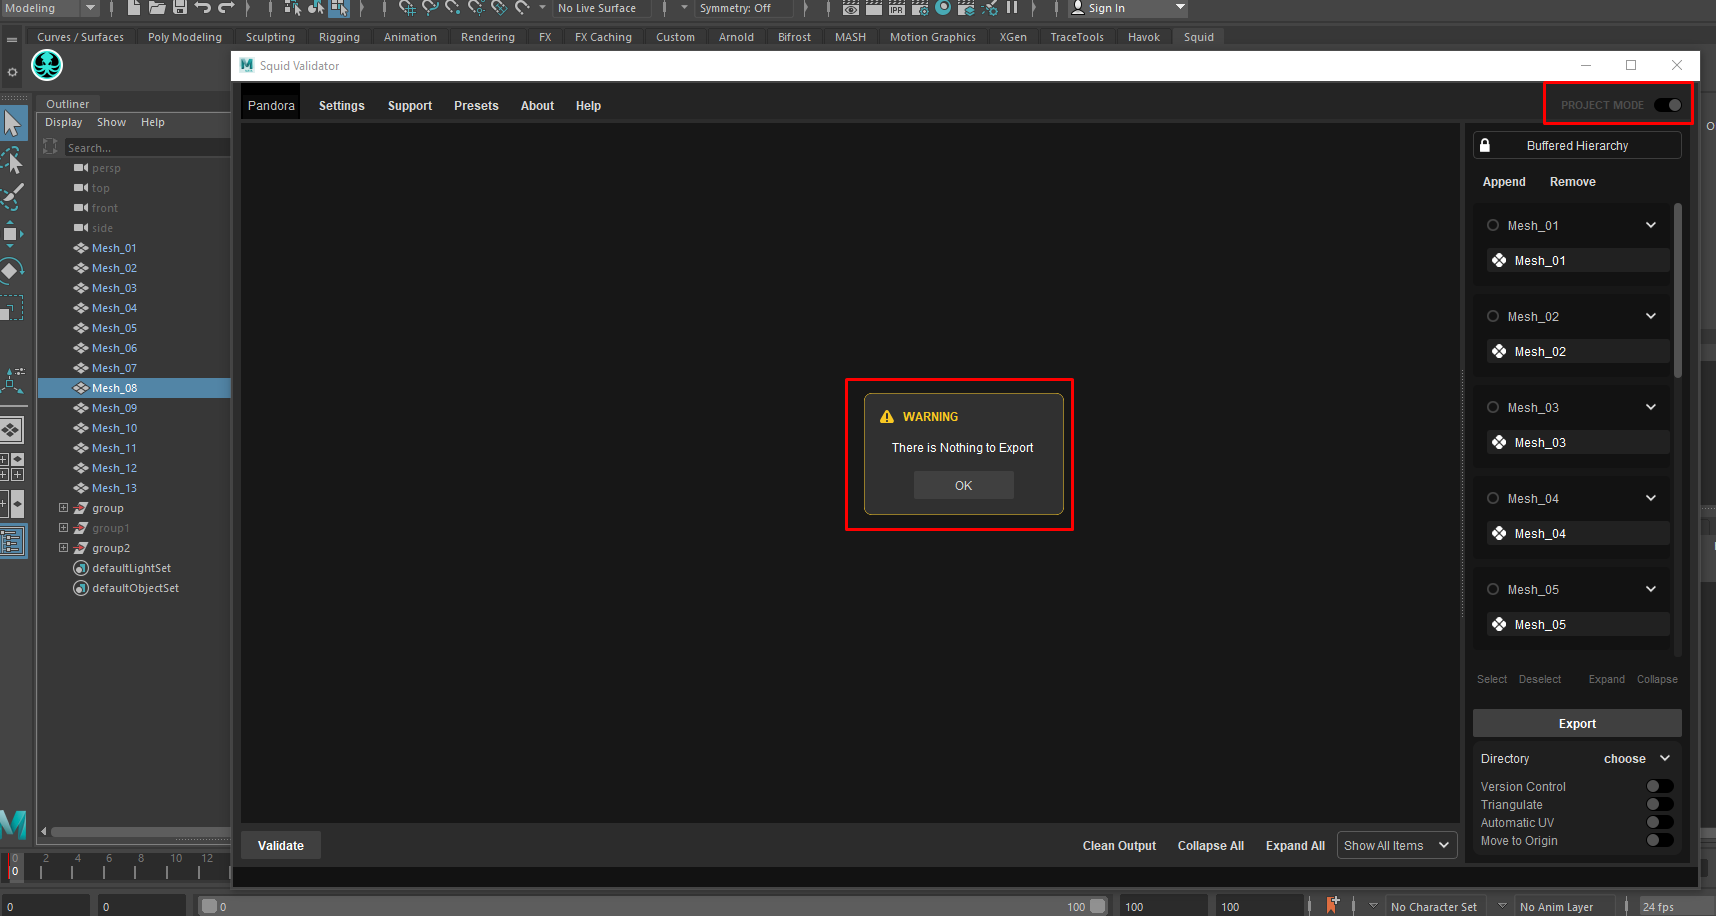
If everything was selected correctly, the user see “Exported successfully” information window.
If no object were selected or in Project mode were selected objects from the Outliner not from the hierarchy, the user will see warning: “There is Nothing to Export”.
Execution of checks
Maya
Description of checks
|
Name |
Description of checks |
Parameters (button “A” in the check list) |
Screenshot |
|---|---|---|---|
Scene |
|||
|
File format In Results: Scene File Format |
Check if this scene is saved as an ASCII or binary file type Maya ASCII file allows the user to open the file in a text editor, such as Notepad, and edit the scene directly within the script of the file. Maya binary file strips out the text information and compresses it into numeric values, reducing file size, but making it impossible to edit the script from a text editor. |
type: ASCII or Binary |
|
|
Units In Results: Scene Units |
Check the units in which you currently work in Maya |
Units: millimeter, centimeter, meter, inch, foot, yard |
|
|
Up Axis In Results: Scene Up Axis |
Check that defined axis used as the up direction |
Axis: Y or Z |

|
|
Color management In Results: Scene Color management |
check if color management is ON or OFF in the scene Color management gives the user the advantages of a scene-linear workflow, while still showing a preview that is appropriate for your display in the viewport and Render View |
Used: disabled or enabled |
|
|
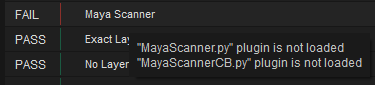
Scanner In Results: Maya Scanner |
check if MayaScanner and MayaScanerCB plugins are loaded, and scanned for known malicious scripts The scanner finds and removes known malicious scripts in both Maya scene files and the Maya install. |
Manual component: disabled or enabled Active component: disabled or enabled Scanned: disabled or enabled |
|
|
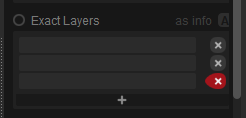
Exact Layers |
check if scene have valid layer names |
users_layer_name: disabled or enabled Quantity set by the user |
|
|
No Layers |
check for extra layers in scene |
||
|
Unused Materials |
check if this scene has materials that are not used |
|
|
Object |
|||
|
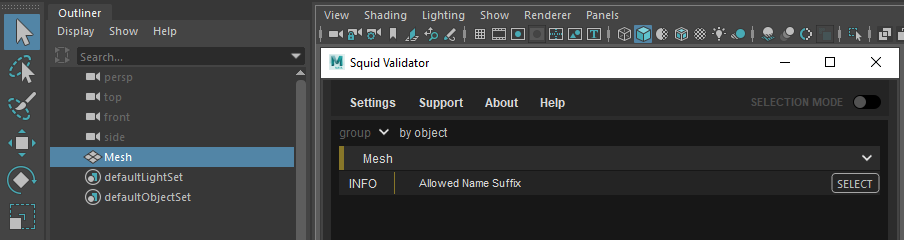
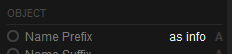
Name prefix In Results: Allowed prefix |
check object names for allowed prefixes |
users_prefix_name: disabled or enabled Quantity set by the user |
|
|
Name suffix In Results: Allowed suffix |
check object names for allowed for suffixes |
user_suffix_name: disabled or enabled Quantity set by the user |
|
|
History & Blind Data |
this check searching and cleaning up the history, including BlindData Construction history refers to the history of actions that created the scene. Blind data is information stored with polygons which is not used by Maya in any way, but is useful to the platform to which you export the polygons. |
||
|
Transform In Results: Object Transform |
checking if objects have null transforms |
Translate: disabled or enabled Rotate: disabled or enabled Scale: disabled or enabled |
|
|
Pivot Coordinate |
check that object pivot coordinates are equal to its transform coordinates |
Position: disabled or enabled Rotation: disabled or enabled |
|
|
Pivot in World Origin |
check that object pivot lie at world origin coordinates |
||
|
Tangent Space |
check that shape is representing a right/left-handed coordinate system By default, Maya uses a right-handed tangent space. That is, the normal, tangent, and the binormal form a right-handed coordinate system. |
System: Right Handed or Left Handed |
|
|
Animated Attributes |
check for animated attributes Set attribute names to check animation keys (fix action will set specified frames from start to end and delete animation keys for enabled attributes) |
Start: users_number End: users_number translateX: disabled or enabled translateY: disabled or enabled translateZ: disabled or enabled rotateX: disabled or enabled rotateY: disabled or enabled rotateZ: disabled or enabled scaleX: disabled or enabled scaleY: disabled or enabled scaleZ: disabled or enabled |
|
Mesh |
|||
|
Triangles Percentage |
check how much triangle has mesh |
Threshold: users_number from 0 to 1 |
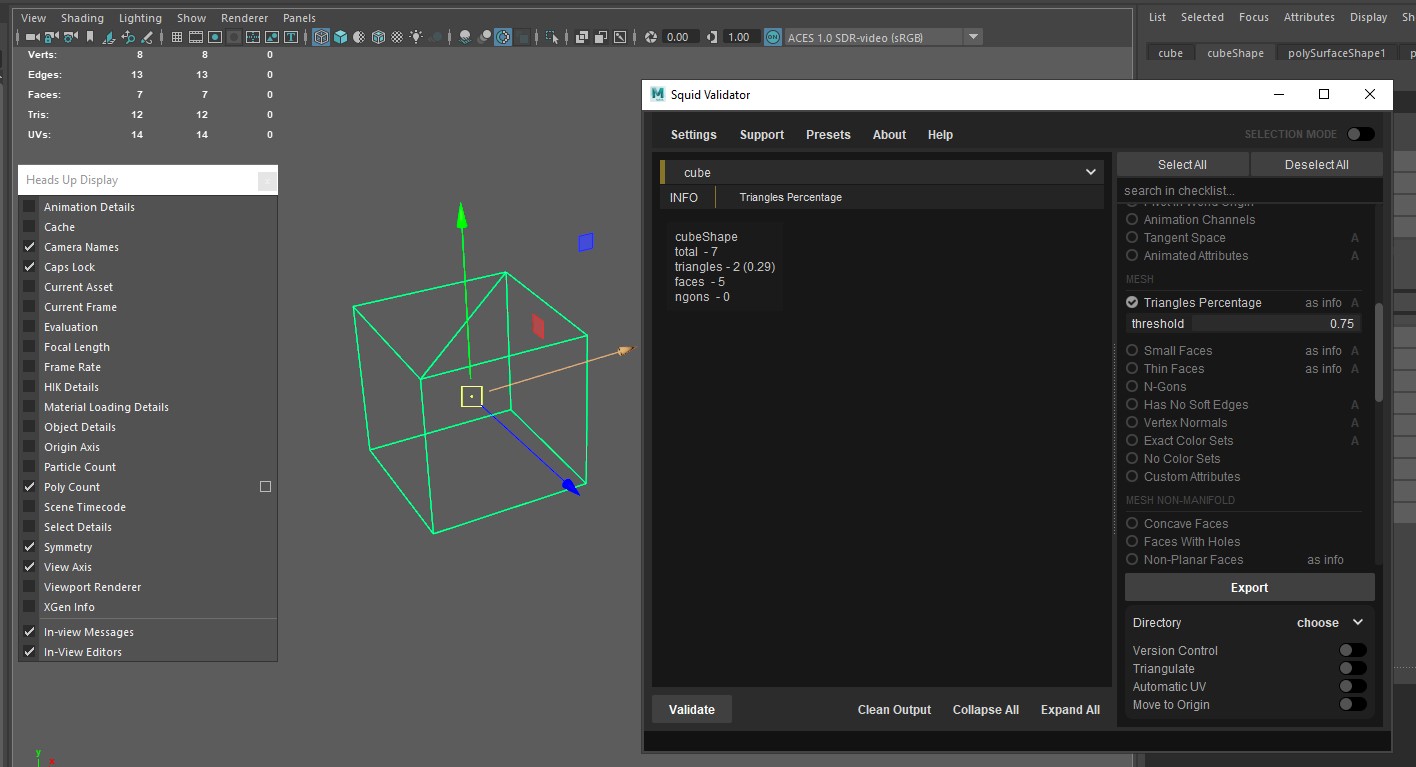
|
|
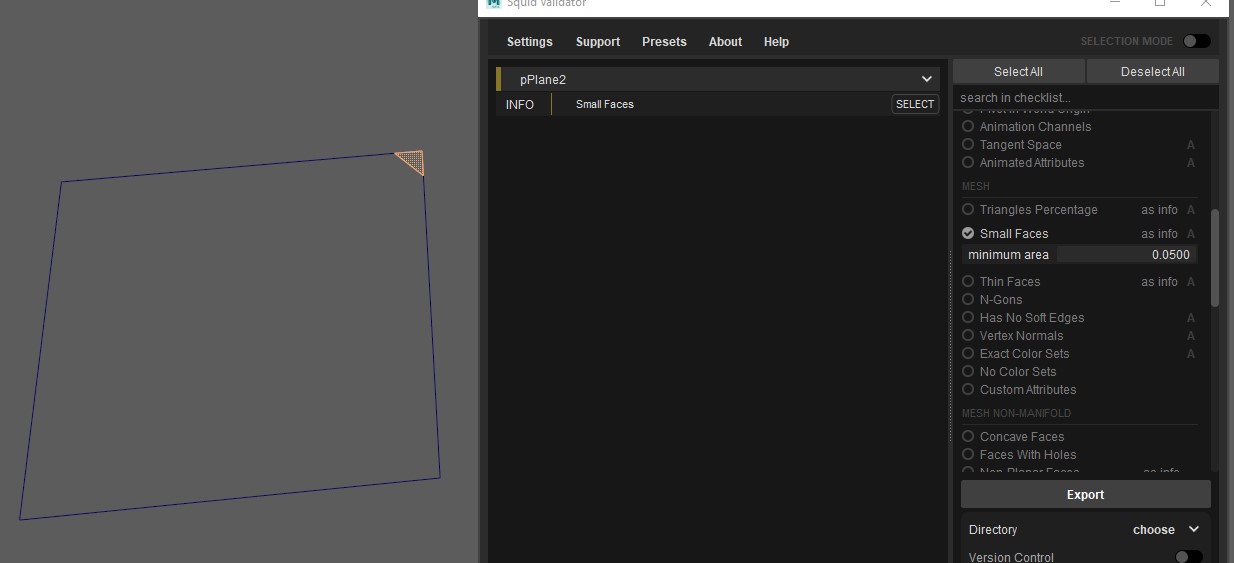
Small Faces |
check if mesh has a small area polygons |
Minimum area: users_number from 0 to 1 |
|
|
Thin Faces |
check if mesh has a thin or long polygons |
Threshold: users_number from 0 to 1 |
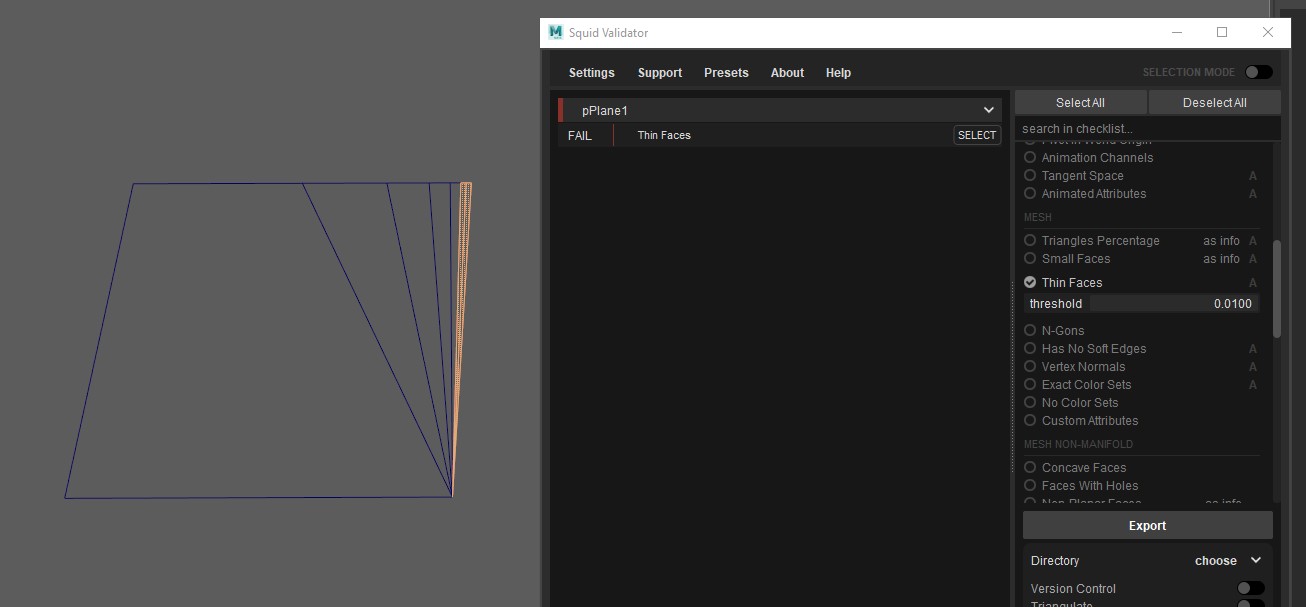
|
|
N-Gons |
checking geometry for n-gons N-gons - polygons with more than four sides, they are not as commonly used for modeling. |
||
|
Has No Soft Edges |
check if mesh does not have hard edges only (has at least one soft edge) When normals for a particular vertex all point in the same direction (called soft or shared vertex normals), there is a soft edge transition between the faces in smooth shaded mode. When the vertex normals point in the same directions as their faces (called hard vertex normals), the transition between faces is hard, creating a faceted appearance. |
Based on shading: disabled or enabled |
|
|
Vertex Normals |
check if mesh has vertices with locked/unlocked normals Normals have a direct effect on the appearance of shaded polygons. The user can modify their appearance by first unlocking, editing the normals, and then locking them. |
Locked: disabled or enabled |
|
|
Exact Color Sets |
check if objects have valid color set names |
users_color_set_name: disabled or enabled Quantity set by the user |
|
|
No Color Sets |
check if objects have any color set |
||
|
Custom Attributes |
checking geometry for user defined attributes The user can add dynamic custom attributes to his node. Some applications include:
|
||
|
Duplicate Faces |
checking geometry for duplicates of faces that have the same positions and number of vertexes |
||
Mesh non-manifold |
|||
|
Concave Faces |
checks for concave faces 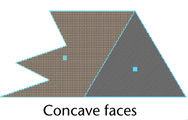
|
|
|
|
Faces With Holes |
checks for faces with holes 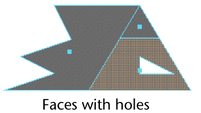
|
||
|
Non-Planar Faces |
checks for non-planar faces 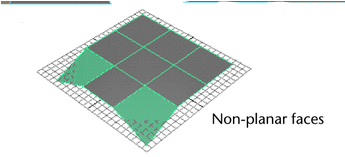
|
||
|
Lamina Faces |
checks for faces that share all of their edges When the user selects Lamina Faces for removal, Maya removes faces that share all edges. By removing these types of faces, the user can avoid unnecessary processing time. |
||
|
Non-Manifold Geometry |
checks for invalid polygon geometry Non-manifold topology polygons have a configuration that cannot be unfolded into a continuous flat piece. 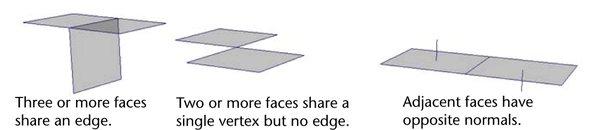
|
||
|
Zero Length Edges In Results: Edges With a Zero Length |
checks for edges that are very short, within the specified tolerance Parameter specifies the minimum length of edges |
Length tolerance: users_number from 0 to 1 |
|
|
Zero Area Faces In Results: Faces With a Zero Area |
checks for faces with area, within the specified tolerance Parameter specifies the minimum area of faces When the user selects to remove faces with a zero geometry area (for example, remove faces with areas between 0 and 0.0001), faces are removed by merging vertices. 
|
Area tolerance: users_number from 0 to 1 |
|
|
Zero Map Area Faces In Results: Faces With a Zero Map Area |
checks for faces with map area, within the specified tolerance Parameter specifies the minimum map area of faces When the user selects to remove faces with a zero map area, it checks the related UV texture coordinates for the face and removes faces where the UVs do not fit within the specified tolerance. |
Area tolerance: users_number from 0 to 1 |
|
|
Isolated Components In Results: Isolated Edges, Vertices, and UVs |
checks for isolated edges, vertices, and UVs on the selected object |
||
Mapping |
|||
|
Single UV Set |
checking if mesh have more than one UV set 
|
||
|
Single UV Tile |
checking if texture coordinates lie in one UV tile range (wrong result would be shown as error message) |
For uv sets: users_expression Required: disabled or enabled Has an “Append task” function - duplicating the parameter block for other uv sets. |
|
|
Overlapped UV |
checking if mesh have overlapped UV faces (wrong result would be shown as error message) 
|
For uv sets: users_expression Required: disabled or enabled Has an “Append task” function - duplicating the parameter block for other uv sets. |
|
|
Flipped UV |
checking if mesh have flipped UV faces (wrong result would be shown as error message) |
For uv sets: users_expression Required: disabled or enabled Has an “Append task” function - duplicating the parameter block for other uv sets. |
|
|
Hard Edges is UV Borders |
this check gets all hard edges of the mesh and checks if they are represented as border on UV |
Based on shading: disabled or enabled For uv sets: users_expression Required: disabled or enabled Has an “Append task” function - duplicating the parameter block for other uv sets. |
|
|
UV Border is Hard Edges |
this check gets all UV borders of the mesh and checks if they are represented as hard edges |
Based on shading: disabled or enabled For uv sets: users_expression Required: disabled or enabled Has an “Append task” function - duplicating the parameter block for other uv sets. |
|
|
Texel Density |
checking if mesh valid texel density Size of a UV shell by specifying the number of texels (pixels per unit) it should contain. |
Min: users_number px/unit Max: users_number px/unit Map size: users_number pixels |
|
|
Coverage In Results: UV Coverage |
check the space coverage of the first UV tile The amount of UV space currently occupied by shells divided by open space. |
Min: users_number % Max: users_number % For uv sets: users_expression Required: disabled or enabled Has an “Append task” function - duplicating the parameter block for other uv sets. |

|
|
UV Set Names Order |
checking the order of uv sets names Parameters append UV sets name in the order they should be (success if all UV sets match with any count of the first input) |
List of user_uv_set_name Quantity set by the user |
|
|
Exact UV Set |
check if objects have valid UV set names Parameters append exact names that should match with the existing UV sets |
user_uv_set_names: enabled or disabled Quantity set by the user |
|
|
UV Sets Count |
check the count of uv sets |
Minimum: users_number from 0 to 99 Maximum: users_number from 0 to 99 |
|
Material |
|||
|
Name Pattern In Results: Material Naming |
check material names using regular expression |
Regex: users_expression |
|
|
Name Prefix In Results: Material Prefix |
check material names for allowed prefixes |
users_prefix_name: disabled or enabled Quantity set by the user |
|
|
Name Suffix In Results: Material Suffix |
check material names for allowed suffixes |
user_suffix_name: disabled or enabled Quantity set by the user |
|
|
Allowed Types In Results: Material Types |
check objects for allowed material types |
Lambert: disabled or enabled Blinn: disabled or enabled Phong: disabled or enabled PhongE: disabled or enabled SurfaceShader: disabled or enabled HairPhysicalShader: disabled or enabled Anisotropic: disabled or enabled RampShader: disabled or enabled users_types: disabled or enabled Quantity set by the user |
|
|
Default Material |
this check detects polygons without materials on them |
||
LOD |
|||
|
Levels Count In Results: LOD Levels Count |
check a number of LOD levels note: use this check on levels group |
Minimum: users_number from 0 to 99 Maximum: users_number from 0 to 99 |
|
|
Levels Percentage In Results: LOD Levels Percentage |
check triangle count for each LOD mesh as a percentage related to the first one note: use this check on levels group |
List of paired values: min: users_number % and max: users_number % Quantity set by the user |
|
3ds Max
Description of checks
|
Name |
Description of checks |
Parameters (button “A” in the check list) |
Screenshot |
|---|---|---|---|
Scene |
|||
|
Units In Results: Scene Units |
Check the units in which you currently work in 3ds Max |
Unit scale: by default is 1.0 Units: millimeter, centimeter, meter, kilometer, inch, feet, mile |
|
|
Exact Layers |
check if scene have valid layers names |
||
|
No Layers |
check for extra layers in scene |
||
Object |
|||
|
Name prefix In Results: Allowed prefix |
check object names for allowed prefixes |
users_prefix_name: disabled or enabled Quantity set by the user |

|
|
Name suffix In Results: Allowed suffix |
check object names for allowed for suffixes |
user_suffix_name: disabled or enabled Quantity set by the user |
|
|
No Modifiers |
checking objects for modifiers |
|
|
|
Transform In Results: Object Transform |
checking if objects have null transforms |
Translate: disabled or enabled Rotate: disabled or enabled Scale: disabled or enabled |
|
|
Pivot in World Origin |
check that object pivot lie at world origin coordinates |
||
|
Instances |
check objects for instances group |
||
Mesh |
|||
|
Mesh Cleaner |
check mesh via Mesh Cleaner modifier |
||
|
Triangles Percentage |
check how much triangle has mesh |
Threshold: users_number from 0 to 1 |
|
|
N-Gons |
checking geometry for n-gons N-gons - polygons with more than four sides, they are not as commonly used for modeling. |
||
|
Zero Length Edges In Results: Edges With a Zero Length |
checks for edges that are very short, within the specified tolerance Parameter specifies the minimum length of edges |
Length tolerance: users_number from 0 to 1 |
|
|
Zero Area Faces In Results: Faces With a Zero Area |
checks for faces with area, within the specified tolerance Parameter specifies the minimum area of faces When the user selects to remove faces with a zero geometry area (for example, remove faces with areas between 0 and 0.0001), faces are removed by merging vertices. 
|
Area tolerance: users_number from 0 to 1 |
|
|
Custom Attributes |
checking geometry for user defined attributes |
||
|
Concave Faces |
checks for concave faces 
|
||
|
Isolated Vertices |
checks the isolated elements on mesh |
||
|
Duplicate Faces |
checking geometry for duplicates of faces that have the same positions and number of vertexes |
||
Mapping |
|||
|
Single UV Set |
checking if mesh have more than one UV set |
|
|
|
Single UV Tile |
checking if texture coordinates lie in one UV tile range (wrong result would be shown as error message) |
For uv sets: users_expression Required: disabled or enabled Has an “Append task” function - duplicating the parameter block for other uv sets. |
|
|
Overlapped UV |
checking if mesh have overlapped UV faces (wrong result would be shown as error message) 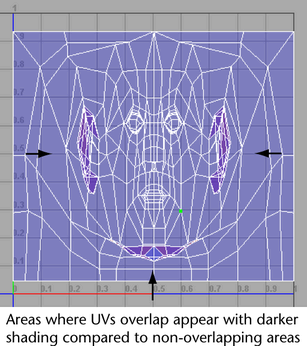
|
For uv sets: users_expression Required: disabled or enabled Has an “Append task” function - duplicating the parameter block for other uv sets. |
|
|
Flipped UV |
checking if mesh have flipped UV faces (wrong result would be shown as error message) |
For uv sets: users_expression Required: disabled or enabled Has an “Append task” function - duplicating the parameter block for other uv sets. |
|
|
Texel Density |
checking if mesh valid texel density Size of a UV shell by specifying the number of texels (pixels per unit) it should contain. |
Min: users_number px/unit Max: users_number px/unit Map size: users_number pixels |
|
|
UV Set Names Order |
checking the order of uv sets names Parameters append UV sets name in the order they should be (success if all UV sets match with any count of the first input) |
List of user_uv_set_name Quantity set by the user |
|
|
Exact UV Set |
check if objects have valid UV set names Parameters append exact names that should match with the existing UV sets |
user_uv_set_names: enabled or disabled Quantity set by the user |
|
|
UV Sets Count |
check the count of uv sets |
Minimum: users_number from 0 to 99 Maximum: users_number from 0 to 99 |
|
Material |
|||
|
Name Pattern In Results: Material Naming |
check material names using regular expression |
Regex: users_expression |
|
|
Name Prefix In Results: Material Prefix |
check material names for allowed prefixes |
users_prefix_name: disabled or enabled Quantity set by the user |
|
|
Name Suffix In Results: Material Suffix |
check material names for allowed suffixes |
user_suffix_name: disabled or enabled Quantity set by the user |
|
|
Allowed Types In Results: Material Types |
check objects for allowed material types |
Parameters list: 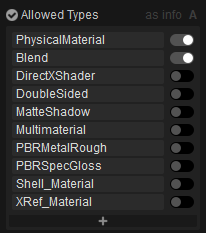
Quantity set by the user |
|
|
Default Material |
this check detects mesh without materials on them |
||
Blender
Description of checks
|
Name |
Description of checks |
Parameters (button “A” in the check list) |
Screenshot |
|---|---|---|---|
Scene |
|||
|
Metric Units In Results: Scene Metric Units |
Check the units in which you currently work in Blender |
Unit scale: by default is 1.0 Units: adaptive, micrometer, millimeter, centimeter, meter, kilometer Rotation: degrees or radians |

|
Object |
|||
|
Name prefix In Results: Allowed prefix |
check object names for allowed prefixes |
users_prefix_name: disabled or enabled Quantity set by the user |
|
|
Name suffix In Results: Allowed suffix |
check object names for allowed for suffixes |
user_suffix_name: disabled or enabled Quantity set by the user |
|
|
No Modifiers |
checking objects for modifiers |
|
|
|
Transform In Results: Object Transform |
checking if objects have null transforms |
Translate: disabled or enabled Rotate: disabled or enabled Scale: disabled or enabled |
|
|
Pivot Center |
check that object pivot coordinates are in the center of object |
||
|
Pivot in World Origin |
check that object pivot lie at world origin coordinates |
||
Mesh |
|||
|
Triangles Percentage |
check how much triangle has mesh |
Threshold: users_number from 0 to 1 |
|
|
N-Gons |
checking geometry for n-gons N-gons - polygons with more than four sides, they are not as commonly used for modeling. |
||
|
Non-Manifolds |
checks for invalid polygon geometry Non-manifold topology polygons have a configuration that cannot be unfolded into a continuous flat piece. 
|
||
|
Has No Soft Edges |
check if mesh does not have shar[ edges only (has at least one sharp edge) |
||
|
Zero Length Edges In Results: Edges With a Zero Length |
checks for edges that are very short, within the specified tolerance Parameter specifies the minimum length of edges |
Length tolerance: users_number from 0 to 1 |
|
|
Zero Area Faces In Results: Faces With a Zero Area |
checks for faces with area, within the specified tolerance Parameter specifies the minimum area of faces When the user selects to remove faces with a zero geometry area (for example, remove faces with areas between 0 and 0.0001), faces are removed by merging vertices. 
|
Area tolerance: users_number from 0 to 1 |
|
|
Loose Geometry |
checks the isolated elements on mesh |
||
|
Duplicate Faces |
checking geometry for duplicates of faces that have the same positions and number of vertexes |
||
Mapping |
|||
|
Single UV Tile |
checking if texture coordinates lie in one UV tile range (wrong result would be shown as error message) |
For uv sets: users_expression Required: disabled or enabled Has an “Append task” function - duplicating the parameter block for other uv sets. |
|
|
Single UV Set |
checking if mesh have more than one UV set 
|
||
|
UV Sets Count |
check the count of uv sets |
Minimum: users_number from 0 to 99 Maximum: users_number from 0 to 99 |
|
|
Overlapped UV |
checking if mesh have overlapped UV faces (wrong result would be shown as error message) 
|
For uv sets: users_expression Required: disabled or enabled Has an “Append task” function - duplicating the parameter block for other uv sets. |
|
|
Flipped UV |
checking if mesh have flipped UV faces (wrong result would be shown as error message) |
For uv sets: users_expression Required: disabled or enabled Has an “Append task” function - duplicating the parameter block for other uv sets. |
|
|
Seams is Marked Sharp |
this check gets all edges marked as sharp on the mesh and checks if they are represented as seam |
|
|
|
UV Islands Borders Marked Seams |
this check gets all UV borders of the mesh and checks if they are represented as sharp edges |
For uv sets: users_expression Required: disabled or enabled |
|
|
Seams is UV Borders |
this check all edges marked as seams is uv islands borders |
For uv sets: users_expression Required: disabled or enabled |
|
|
Texel Density |
checking if mesh valid texel density Size of a UV shell by specifying the number of texels (pixels per unit) it should contain. |
Min: users_number px/unit Max: users_number px/unit Map size: users_number pixels |
|
|
UV Set Names Order |
checking the order of uv sets names Parameters append UV sets name in the order they should be (success if all UV sets match with any count of the first input) |
List of user_uv_set_name Quantity set by the user |
|
|
Exact UV Set |
check if objects have valid UV set names Parameters append exact names that should match with the existing UV sets |
user_uv_set_names: enabled or disabled Quantity set by the user |
|
Material |
|||
|
Name Pattern In Results: Material Naming |
check material names using regular expression |
Regex: users_expression |
|
|
Name Prefix In Results: Material Prefix |
check material names for allowed prefixes |
users_prefix_name: disabled or enabled Quantity set by the user |
|
|
Name Suffix In Results: Material Suffix |
check material names for allowed suffixes |
user_suffix_name: disabled or enabled Quantity set by the user |
|
|
Allowed Types In Results: Material Types |
check objects for allowed material types |
Parameters list: 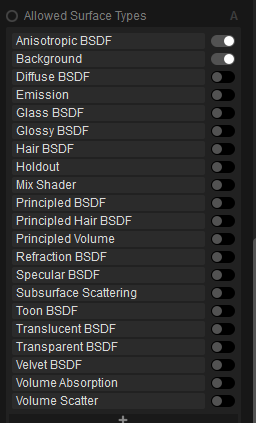
Quantity set by the user |
|
|
Default Material |
this check detects mesh without materials on them |
||
|
Empty Material |
this check detects mesh with none type materials on them |
||
Results of checks
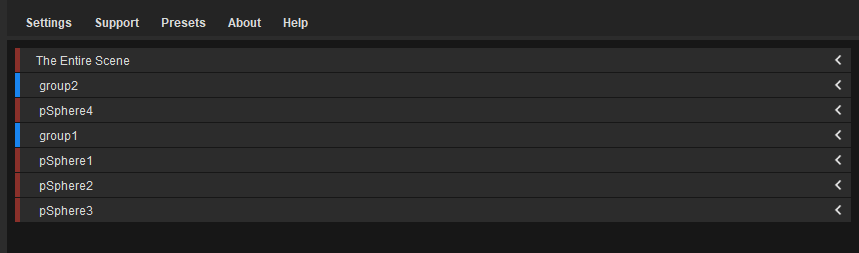
Results at the main window are grouped by objects selected for check. It is useful if the user has a lot of objects on scene or in hierarchy.
Results of a check can be of four types:
PASS - no errors were found during the check
FAIL - the object has errors that require a fix
INFO - the object has specialty that needs to pay attention
BUG - an internal error has occurred
When the user hover a failed check with a mouse, he can see some information about the error.
An automatic fix is available for several failed checks with a FIX ME button.

SELECT button in several failed checks allows the user to select object in Maya scene.
How to run a check
First of all the user need to open scene in Maya and launch the SquidValidator.
Selected mode
-
Select checks from the list of checks at the right side
-
Use the search bar to quickly find needed check
-
If needed mark check “as info” to see failed result as INFO not FAIL
-
If needed, change parameters
-
If you add extra parameter (ex. unnecessary layer name) you can remove it by holding Ctrl
-
-
-
Select objects on Maya scene
-
Press “Validate” button in the SquidValidator
Project mode
-
If Hierarchy is not loaded to the SquidValidator window:
-
Select objects or groups on Maya scene
-
Press “Get Hierarchy” button

-
-
Press “Validate button”
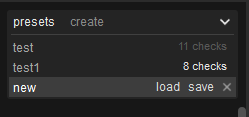
Checklist Presets
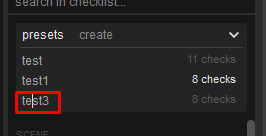
Checklist presets allow the user quickly switch between different sets of checks that can be useful if the user needs to run different checks for different objects. Checklist presets available only in the Selection mode and can be found in the right part of the screen above the checklist.
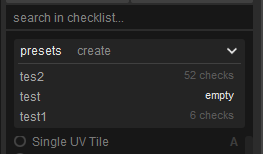
Saved presets are only available locally (only for the user who created them)
How to create the preset
-
Select checks that you need from the list
-
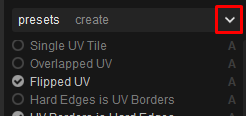
Click on drop-down arrow button on the “Presets” widget
-
Enter the preset name
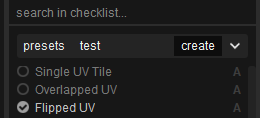
-
Click the “Create” button
Preset will appear on the list
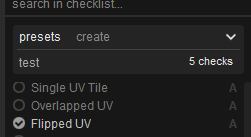
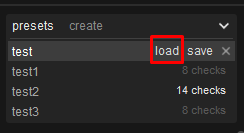
How to load the preset
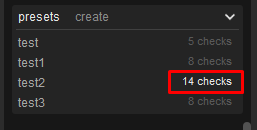
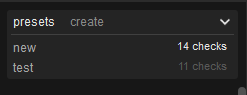
Current selected preset is highlighted with the white font on the count of checks.
If the user want to change the preset, he needs to:
-
Click on drop-down arrow button on the “Presets” widget
-
Hover necessary preset with a mouse
-
Click the “Load” button
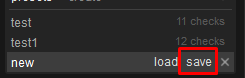
How to update the preset
The user can change the name of the preset or list of checks included in the preset.
To change name of the preset:
-
Click on drop-down arrow button on the “Presets” widget
-
Click on current preset name
-
Remove previous name and enter the new one
-
Click outside the preset area
To change list of checks:
-
Click on drop-down arrow button on the “Presets” widget
-
Load the preset you want to change
-
Change the list of checks
-
Hover the preset with a mouse
-
Click the “Save” button
How to delete the preset
-
Click on drop-down arrow button on the “Presets” widget
-
Hover the necessary preset with a mouse
-
Click on the cross button

The preset will be deleted from a list.
Project Setup
Project is a set of predefined settings including hierarchy of objects, checks that are runs for different objects and export settings. Information about the project settings is stored on server and is the same for all users.
The user can change the project from the settings window.
When the user select the project and open a scene, he can add hierarchy to the SquidValidator window. Information about buffered hierarchy are stored with the scene and available for other users.
How to add hierarchy
- Select objects on Maya scene or in Outliner window
-
Open SquidValidator and press “Get Hierarchy” or “Append” buttons
If hierarchy on scene matches with the project pattern, it added to the list at the right part of the validator window.
If hierarchy does not match with the pattern, warning window “No match with patter” appears.
If the user tries to add hierarchy for the second time, warning window: “Some of these objects are used already” appears.
Names of groups in hierarchy tab are used as names for the export files and can be change by the user without changing names of object on scene.
How to work with Project Editor
There are three ways to open a Project Editor from the setting menu: Create new project, Edit current project and Clone selected project.
There is no difference in functionality of the Project Editor, only in content. Create opens empty editor, Edit and Clone - with the information about selected project but Clone option also allows the user to save project as new.
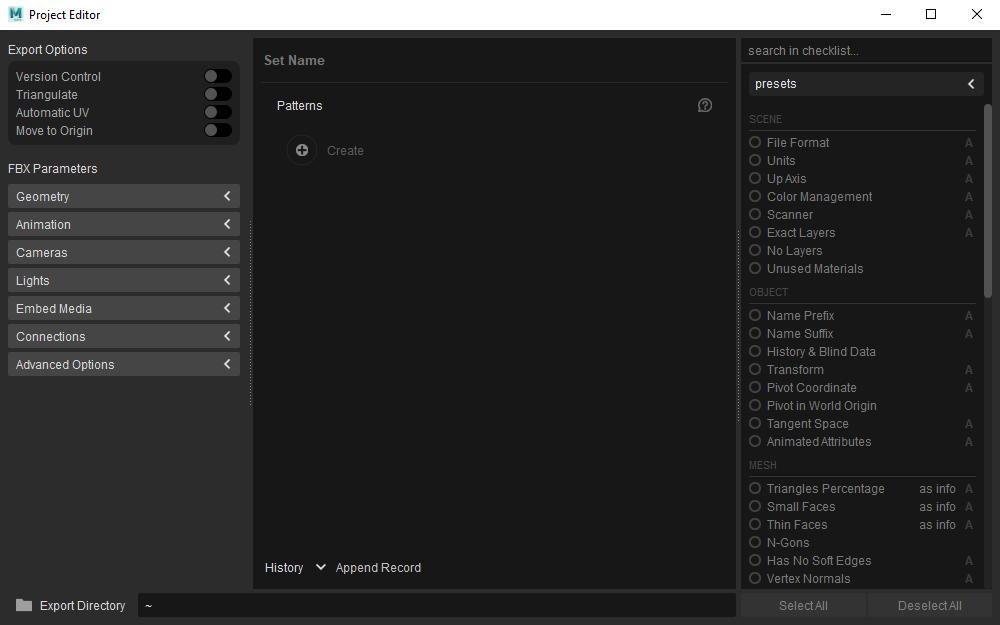
Project Editor consists from
- Name of the project
- Hierarchy and Patterns (or rules)
- Export settings including FBX Options
- List of checks the same with the list on Selection mode
-
History of changes at current project

- Directory for export
After the user makes some changes in Project Editor or opens Editor to create new project “Save” button appears to the right from the project name.

“Help” button right from the patterns opens this page in the browser to find any necessary information.
To create a project the user need to:
- Set the project name
- Set the Export and FBX options
- Set the Export directory
- Create hierarchy and patterns/rules for that
- Press on “Save” button
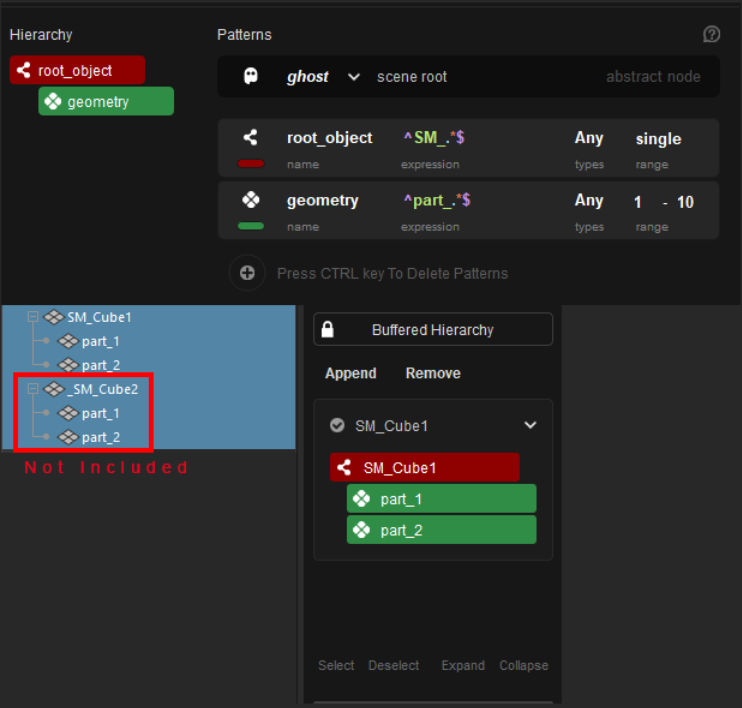
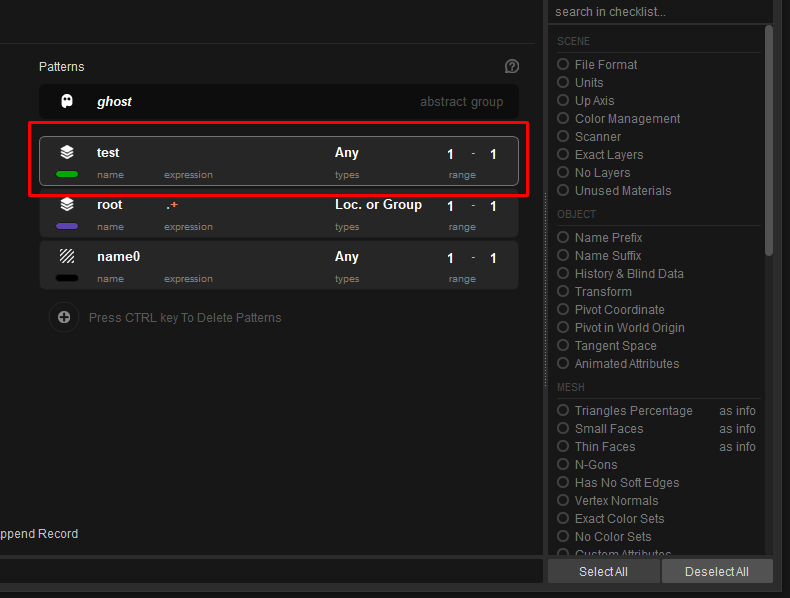
Hierarchy and patterns
Hierarchy is a widget structure for displaying rule relations that describes the hierarchy of objects in a scene. To create a hierarchy the user needs to add at least one rule by clicking on “Plus” button near the “Create” text.
After that the user needs to select the type of the object.
Empty - creates predefined pattern with Any type.
Render - creates predefined pattern with Mesh type
Ghost - creates abstract group. It is used to combine several hierarchy from scene into one asset.
It allows the user to use several different patterns at the first level of the hierarchy. For example,
if the user needs to create a hierarchy with two groups of objects without ghost object he need a single parent
object on scene because he can not create two or more top level pattern in hierarchy.
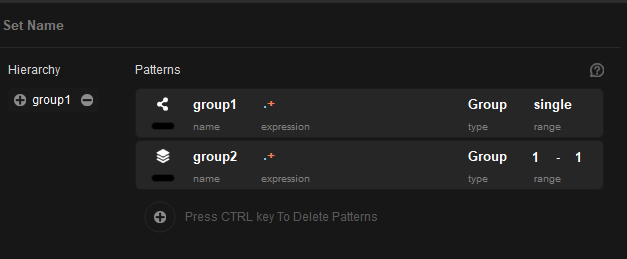
Without ghost group
Ghost group acts as parent object that not exist in scene, only in project parameters. It does not affect the objects hierarchy on scene and allows to use several patterns on a top level of hierarchy.
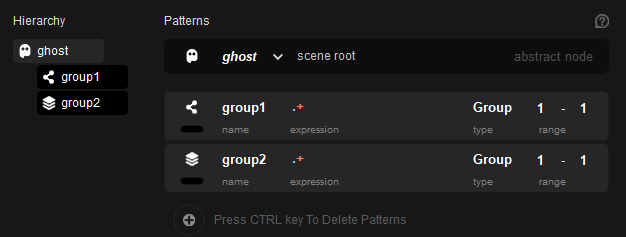
With ghost group
Example of different patterns
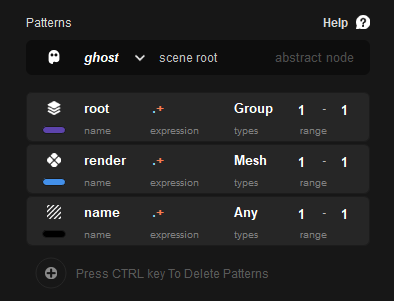
Any pattern can be changed with:
- Name is used to display this rule in hierarchy.
- Color is used to display this rule in hierarchy.
- Icon is used to display this rule in hierarchy.
- Expression is used to find object by name.
- Types is used to find object by type.
- Range is used to set how many objects from scene will be added in buffer hierarchy. Range can be set up as specified number, for example 5-5, or as range of numbers, for example 1-5. If the user select on scene more items then in specified range, for example 6 for range 5-5, Squid Validator selects only 5 items and add it to buffer hierarchy, but if the range set up as 1-5 there will be two groups, first with the 5 items and second with 1 item.
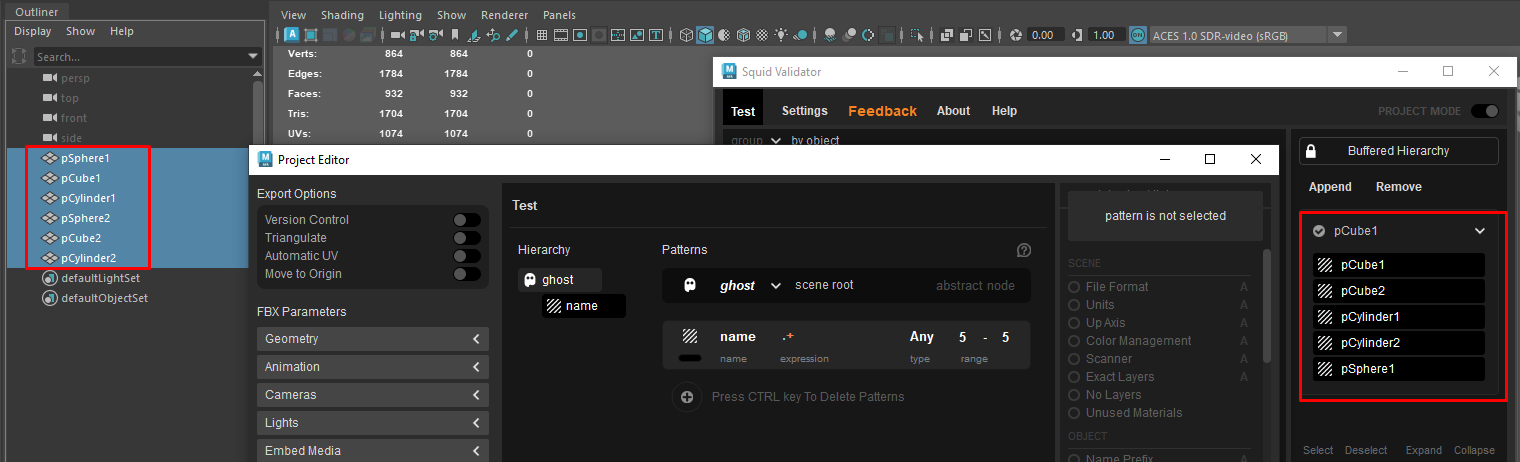
Range 5-5
Range 1-5
List of Regular expressions
Regular expressions are patterns used to match character combinations in strings.
General tokens
.– Any character\n– Newline character\t– Tab character\s– Any whitespace character (including \t, \n and a few others)\S– Any non-whitespace character\d– Matches any digit (Arabic numeral). Equivalent to [0-9]\D– Matches any character that is not a digit (Arabic numeral). Equivalent to [^0-9]\w– Any word character (Uppercase and lowercase Latin alphabet, numbers 0-9, and _)\W– Any non-word character (the inverse of the \w token)\b– Word boundary: The boundaries between \w and \W, but matches in-between characters^– The start of a line$– The end of a line\\– The literal character “\”
Pattern collections
Pattern collections allow you to search for a collection of characters to match against.
Here's a list of the most common pattern collections:
[A-Z]– Match any uppercase character from “A” to “Z”[a-z]– Match any lowercase character from “a” to “z”[0-9]– Match any number[asdf]– Match any character that’s either “a”, “s”, “d”, or “f”[^asdf]– Match any character that’s not any of the following: “a”, “s”, “d”, or “f”[0-9A-Z]– Match any character that’s either a number or a capital letter from “A” to “Z”[a-z]– Match any non-lowercase letter
Quantifiers
Regex quantifiers check to see how many times you should search for a character:
a|b– Match either “a” or “b”?– Zero or one+– One or more*– Zero or more{N}– Exactly N number of times (where N is a number){N,}– N or more number of times (where N is a number){N,M}– Between N and M number of times (where N and M are numbers and N < M)??– Zero or more, but stop after first match
Groups
When searching with a regex, it can be helpful to search for more than one matched item at a time. Each component, separated by a pipe (|), is called an alternative. For example: with the regex (Testing|tests)123 we can match “Testing123” and “tests123”.
Lookahead and lookbehind groups
There are four different types of lookahead and lookbehind:
(?!…)– negative lookahead(?=…)– positive lookahead(?<!…)– negative lookbehind(?<=…)– positive lookbehind
For example: /B(?!A)/ will allow you to match BC but not BA.
For example, pattern on screen finds from 1 to 3 groups with postfix like A0, B123, C5 but does not find mesh or group without postfix or postfix like C, D7, etc.


After creating the pattern the user can create an object in hierarchy by clicking on a plus button near the “Add Pattern” text and selecting from the created patterns.
The user can change type of the object in hierarchy by clicking with right mouse button on it or dragging corresponding pattern on it.
Changing in pattern like name, icon or color will be displayed in hierarchy.
To create the child object in hierarchy, the user need to hover current object with a mouse, click on plus button from the left and select pattern again.
To remove object in hierarchy, the user needs to press hover object with a mouse and click on minus button from the right.
Removing the parent object from hierarchy removes child objects as well.
To remove the pattern, the user needs to hold CTRL key and click on minus button from the left.
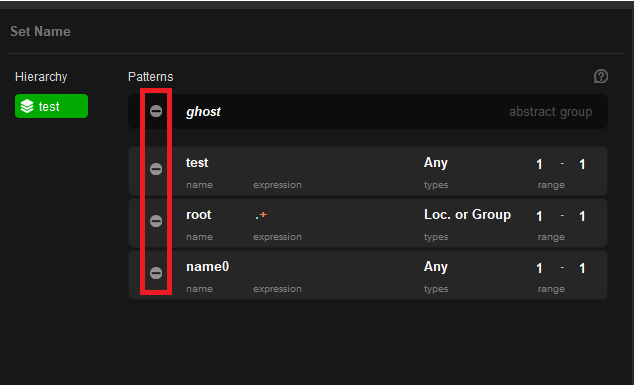
Removing the pattern from the list also removes its corresponding objects in hierarchy with child objects.
The user can select and set any amount of checks for every pattern from the list. To do that, the user needs to:
-
Click on selected pattern
-
Select needed checks from a list
- Set the parameters if needed
- Mark “As info” if needed
An important thing about hierarchy that you should always remember is that if a parent object does not match the rules (this affects all rules, including regular ones), then child objects will not be added to the hierarchy.